Building React Apps With Amplify
From WebStorm
This is to follow the tutorial here: AWS Getting Started, React tutorial.
Assumptions
The following are installed:
- NodeJS (18.04+)
- git (2.35.1)
- NodeJS module: aws-amplify/cli providing the amplify command (amplify -v to check version: 10.4.0+)
Start A New React App
Start a new “React” project in Webstorm in a “react-amplified” directory.
This will install the node libraries needed for creating a React app and setup a standard create-react-app file structure with the source in the default ./src directory.
Configure Amplify
Open the terminal in the root directory of the project.
amplify configureOpens browser, login to AWS, press enter.
When prompted…
username: amplify-react-amplified
Follow the IAM setup defaults on the browser for the new user. Save the access key and secret key in a secure location, you’ll need this later.
Change the profile name from “default”.
profile: react-amplified
Test the React install:
npm startConfigure The Amplify App
This will use the CLI to setup a communication channel with the AWS servers.
amplify initMost defaults are acceptable.
- IDE: IntelliJ IDEA
- Authentication: AWS Access Keys
- You’ll need the keys from the user setup.
- Make sure you select the same region you used to setup the user.
Add The aws-amplify node library
npm install aws-amplifyWire The AWS Config Subsystem Into The App
You’ll now need to tell your React app about the AWS configuration that was setup for you with the amplify command line setup. Edit the src/index.js and add the 3 lines to load in the amplify config:
import React from 'react';
import ReactDOM from 'react-dom/client';
import './index.css';
import App from './App';
import reportWebVitals from './reportWebVitals';

# Add these 3 lines...
import { Amplify } from 'aws-amplify';
import awsExports from './aws-exports';
Amplify.configure(awsExports);

const root = ReactDOM.createRoot(document.getElementById('root'));
root.render(
  <React.StrictMode>
    <App />
  </React.StrictMode>
);

// If you want to start measuring performance in your app, pass a function
// to log results (for example: reportWebVitals(console.log))
// or send to an analytics endpoint. Learn more: https://bit.ly/CRA-vitals
reportWebVitals();
Add A Data API
This is the start of persistent data storage. The default is to use GraphQL with an API.
amplify add apiFollow the default prompts.
Note: The schem is in amplify/backend/api/reactamplified/schema.graphql
Deploy the API
amplify pushFollow the prompts and use the defaults.
Wire In The New ToDO Interface
Edit src/App.js and put this code in place…
/* src/App.js */
import React, { useEffect, useState } from 'react'
import { Amplify, API, graphqlOperation } from 'aws-amplify'
import { createTodo } from './graphql/mutations'
import { listTodos } from './graphql/queries'

import awsExports from "./aws-exports";
Amplify.configure(awsExports);

const initialState = { name: '', description: '' }

const App = () => {
  const [formState, setFormState] = useState(initialState)
  const [todos, setTodos] = useState([])

  useEffect(() => {
    fetchTodos()
  }, [])

  function setInput(key, value) {
    setFormState({ ...formState, [key]: value })
  }

  async function fetchTodos() {
    try {
      const todoData = await API.graphql(graphqlOperation(listTodos))
      const todos = todoData.data.listTodos.items
      setTodos(todos)
    } catch (err) { console.log('error fetching todos') }
  }

  async function addTodo() {
    try {
      if (!formState.name || !formState.description) return
      const todo = { ...formState }
      setTodos([...todos, todo])
      setFormState(initialState)
      await API.graphql(graphqlOperation(createTodo, {input: todo}))
    } catch (err) {
      console.log('error creating todo:', err)
    }
  }

  return (
    <div style={styles.container}>
      <h2>Amplify Todos</h2>
      <input
        onChange={event => setInput('name', event.target.value)}
        style={styles.input}
        value={formState.name}
        placeholder="Name"
      />
      <input
        onChange={event => setInput('description', event.target.value)}
        style={styles.input}
        value={formState.description}
        placeholder="Description"
      />
      <button style={styles.button} onClick={addTodo}>Create Todo</button>
      {
        todos.map((todo, index) => (
          <div key={todo.id ? todo.id : index} style={styles.todo}>
            <p style={styles.todoName}>{todo.name}</p>
            <p style={styles.todoDescription}>{todo.description}</p>
          </div>
        ))
      }
    </div>
  )
}

const styles = {
  container: { width: 400, margin: '0 auto', display: 'flex', flexDirection: 'column', justifyContent: 'center', padding: 20 },
  todo: {  marginBottom: 15 },
  input: { border: 'none', backgroundColor: '#ddd', marginBottom: 10, padding: 8, fontSize: 18 },
  todoName: { fontSize: 20, fontWeight: 'bold' },
  todoDescription: { marginBottom: 0 },
  button: { backgroundColor: 'black', color: 'white', outline: 'none', fontSize: 18, padding: '12px 0px' }
}

export default App
Start up the revised app (or if you did not quit the npm start from earlier it will auto-reload)..
npm run startYou should see the basic TODO app and be able to add entries:

Add User Accounts (Authenticiation)
amplify add authFollow the prompts then…
amplify pushThat will setup a Cognito connection to your Amplify app. Cognito is an AWS service that handles user authentication on an app-specific basis.
Then wire in the authentication module to your app.
Start with adding the Amplify UI module, it will create a user login/create account setup for you:
npm install @aws-amplify/ui-reactAnd update the src/App.js to connect the authentication components.
It needs to include the authentication module, then wrap the main app in the withAuthenitcation() hook during the export.
The new App.js should look like this:
/* src/App.js */
import React, { useEffect, useState } from 'react'
import { Amplify, API, graphqlOperation } from 'aws-amplify'
import { createTodo } from './graphql/mutations'
import { listTodos } from './graphql/queries'
import { withAuthenticator, Button, Heading } from '@aws-amplify/ui-react';
import '@aws-amplify/ui-react/styles.css';
import awsExports from "./aws-exports";
Amplify.configure(awsExports);
const initialState = { name: '', description: '' }
const App = ({ signOut, user }) => {
const [formState, setFormState] = useState(initialState)
const [todos, setTodos] = useState([])
useEffect(() => {
fetchTodos()
}, [])
function setInput(key, value) {
setFormState({ ...formState, [key]: value })
}
async function fetchTodos() {
try {
const todoData = await API.graphql(graphqlOperation(listTodos))
const todos = todoData.data.listTodos.items
setTodos(todos)
} catch (err) { console.log('error fetching todos') }
}
async function addTodo() {
try {
if (!formState.name || !formState.description) return
const todo = { ...formState }
setTodos([...todos, todo])
setFormState(initialState)
await API.graphql(graphqlOperation(createTodo, {input: todo}))
} catch (err) {
console.log('error creating todo:', err)
}
}
return (
<div style={styles.container}>
<Heading level={1}>Hello {user.username}</Heading>
<Button onClick={signOut} style={styles.button}>Sign out</Button>
<h2>Amplify Todos</h2>
<input
onChange={event => setInput('name', event.target.value)}
style={styles.input}
value={formState.name}
placeholder="Name"
/>
<input
onChange={event => setInput('description', event.target.value)}
style={styles.input}
value={formState.description}
placeholder="Description"
/>
<button style={styles.button} onClick={addTodo}>Create Todo</button>
{
todos.map((todo, index) => (
<div key={todo.id ? todo.id : index} style={styles.todo}>
<p style={styles.todoName}>{todo.name}</p>
<p style={styles.todoDescription}>{todo.description}</p>
</div>
))
}
</div>
)
}
const styles = {
container: { width: 400, margin: '0 auto', display: 'flex', flexDirection: 'column', justifyContent: 'center', padding: 20 },
todo: { marginBottom: 15 },
input: { border: 'none', backgroundColor: '#ddd', marginBottom: 10, padding: 8, fontSize: 18 },
todoName: { fontSize: 20, fontWeight: 'bold' },
todoDescription: { marginBottom: 0 },
button: { backgroundColor: 'black', color: 'white', outline: 'none', fontSize: 18, padding: '12px 0px' }
}
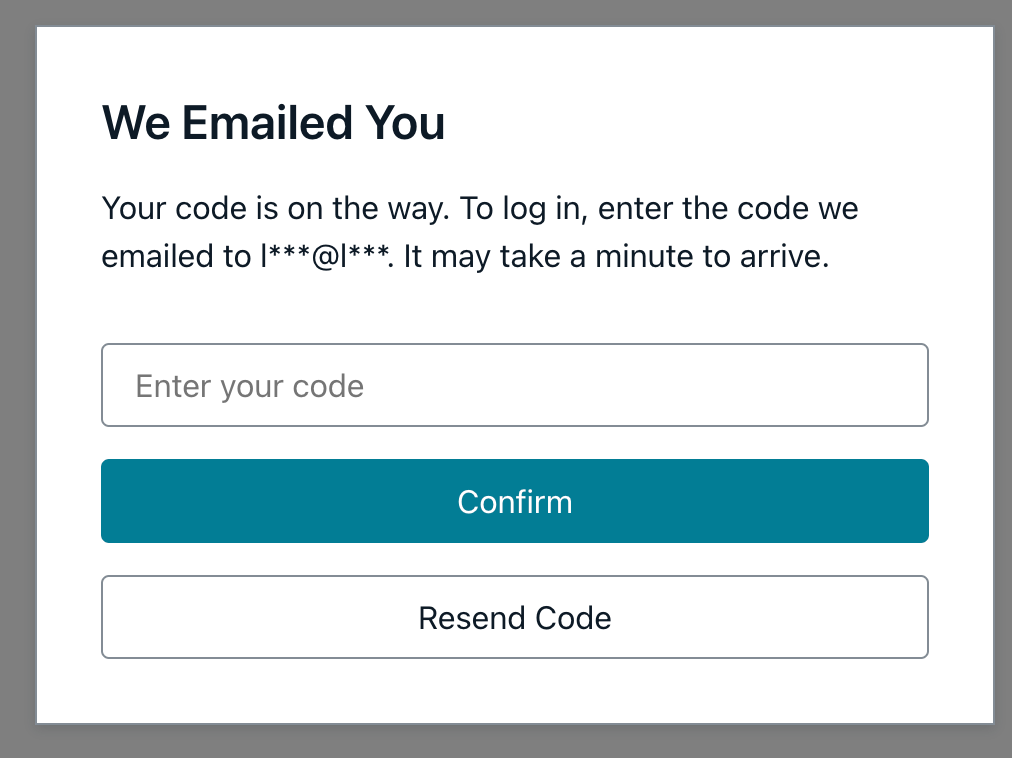
export default withAuthenticator(App);And now npm run start (or it will auto-update if still running), will prompt you to create an account before you can interact with the app:

The Amplify authentication module handles all the basics. It manages creating an account with password confirmations AND an email send/confirmation (if you choose email as the primary login tracking when setting this up). It also handles the standard login and forgot password submodules.

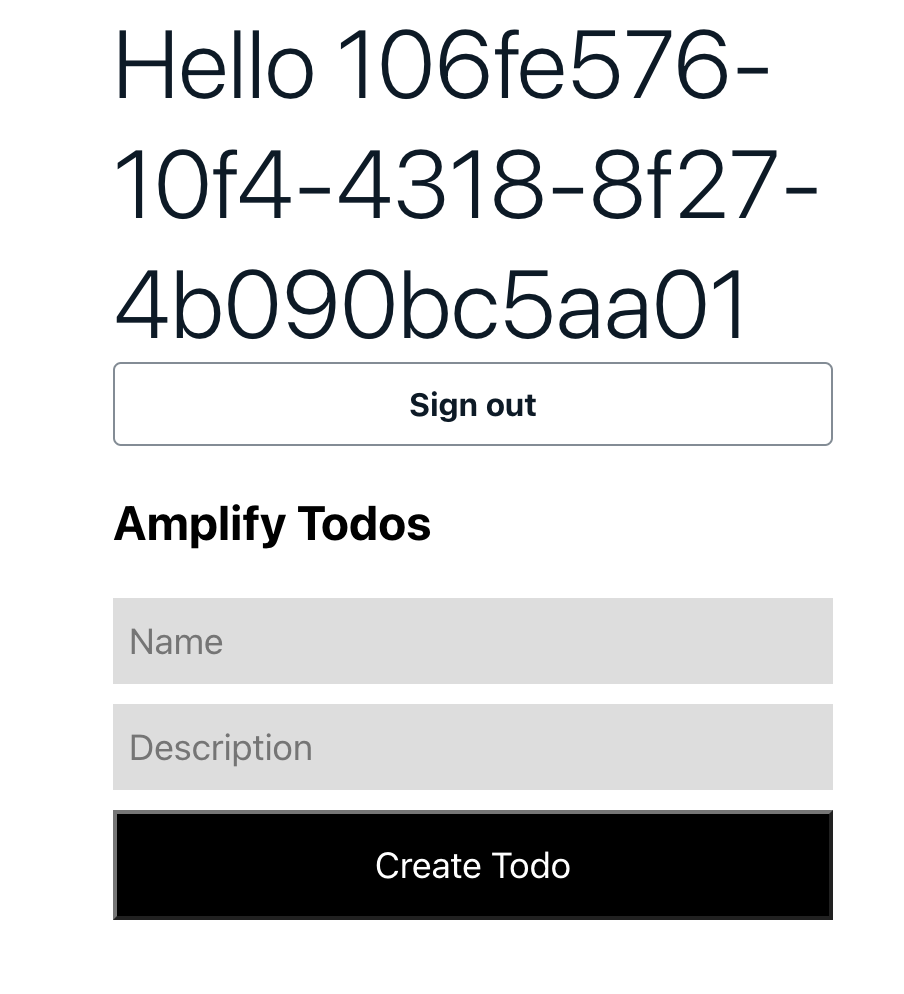
Obviously we have more work to do on the UX, but we now can see our user account is active. No, data is not persistent or user-specific yet (if you log out the to do list goes away) but that is coming in later updates…
And after some code tweaking per the example, modified for an email login (versus username) based setup:
/* src/App.js */
import React, { useEffect, useState } from 'react'
import { Amplify, API, graphqlOperation } from 'aws-amplify'
import { withAuthenticator, Button, Heading, Text, TextField } from '@aws-amplify/ui-react';
import '@aws-amplify/ui-react/styles.css';
import { createTodo } from './graphql/mutations'
import { listTodos } from './graphql/queries'

import awsExports from "./aws-exports";
Amplify.configure(awsExports);

const initialState = { name: '', description: '' }

const App = ({ signOut, user }) => {
  const [formState, setFormState] = useState(initialState)
  const [todos, setTodos] = useState([])

  useEffect(() => {
    fetchTodos()
  }, [])

  function setInput(key, value) {
    setFormState({ ...formState, [key]: value })
  }

  async function fetchTodos() {
    try {
      const todoData = await API.graphql(graphqlOperation(listTodos))
      const todos = todoData.data.listTodos.items
      setTodos(todos)
    } catch (err) { console.log('error fetching todos') }
  }

  async function addTodo() {
    try {
      if (!formState.name || !formState.description) return
      const todo = { ...formState }
      setTodos([...todos, todo])
      setFormState(initialState)
      await API.graphql(graphqlOperation(createTodo, {input: todo}))
    } catch (err) {
      console.log('error creating todo:', err)
    }
  }

  console.log(user);

  return (
      <div style={styles.container}>
          <Heading level={1}>Hello {user.attributes.email}</Heading>
          <Button style={styles.button}onClick={signOut}>Sign out</Button>
          <Heading level={2}>Amplify Todos</Heading>
          <TextField
              placeholder="Name"
              onChange={event => setInput('name', event.target.value)}
              style={styles.input}
              defaultValue={formState.name}
          />
          <TextField
              placeholder="Description"
              onChange={event => setInput('description', event.target.value)}
              style={styles.input}
              defaultValue={formState.description}
          />
          <Button style={styles.button} onClick={addTodo}>Create Todo</Button>
          {
              todos.map((todo, index) => (
                  <div key={todo.id ? todo.id : index} style={styles.todo}>
                      <Text style={styles.todoName}>{todo.name}</Text>
                      <Text style={styles.todoDescription}>{todo.description}</Text>
                  </div>
              ))
          }
      </div>
  )
}

const styles = {
  container: { width: 400, margin: '0 auto', display: 'flex', flexDirection: 'column', justifyContent: 'center', padding: 20 },
  todo: {  marginBottom: 15 },
  input: { border: 'none', backgroundColor: '#ddd', marginBottom: 10, padding: 8, fontSize: 18 },
  todoName: { fontSize: 20, fontWeight: 'bold' },
  todoDescription: { marginBottom: 0 },
  button: { backgroundColor: 'black', color: 'white', outline: 'none', fontSize: 18, padding: '12px 0px' }
}

export default withAuthenticator(App);
Adding Persistent Data Storage
At this point your new Amplify app can be pushed back to AWS from your local dev environment using AWS CLI. You can also deploy the front end and Amplify will spin up a server to host your app, giving you a URL where you can interact with the app.
However at this point all the data from the app, our To Do List in this case, is stored locally in the browser. Close the browser and the data goes away. You have to start all over again.
Time to add persistent data storage to allow the app to remember things after closing the browser.
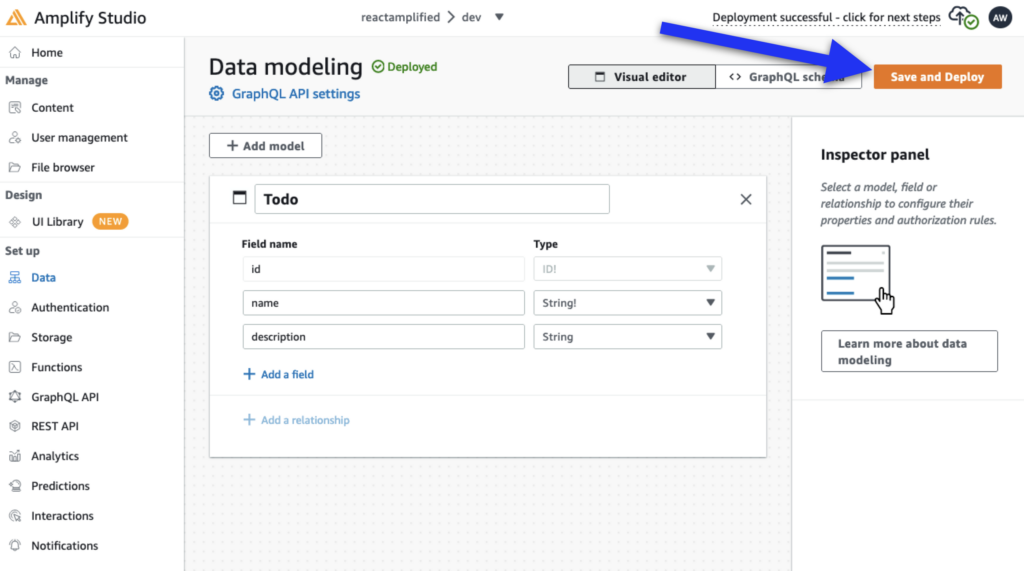
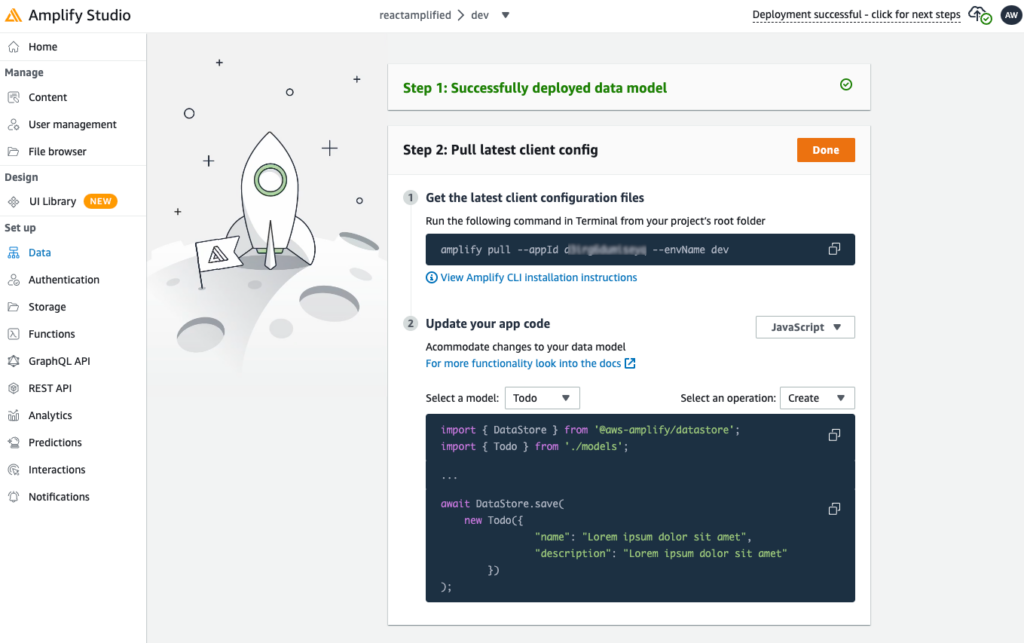
First, you need to save and deploy your GraphSQL so that AWS will spin up a DynamoDB instance for you (it is a NoSQL database hosted on the cloud). Login to AWS, go to your Amplify app, find the backend tab and launch Amplify Studio from there.
Within Amplify Studio go to the data tab and click “Save & Deploy”.
Time to update the code and tell the app to write to the persistent data store as noted on the AWS console after a successful deployment:
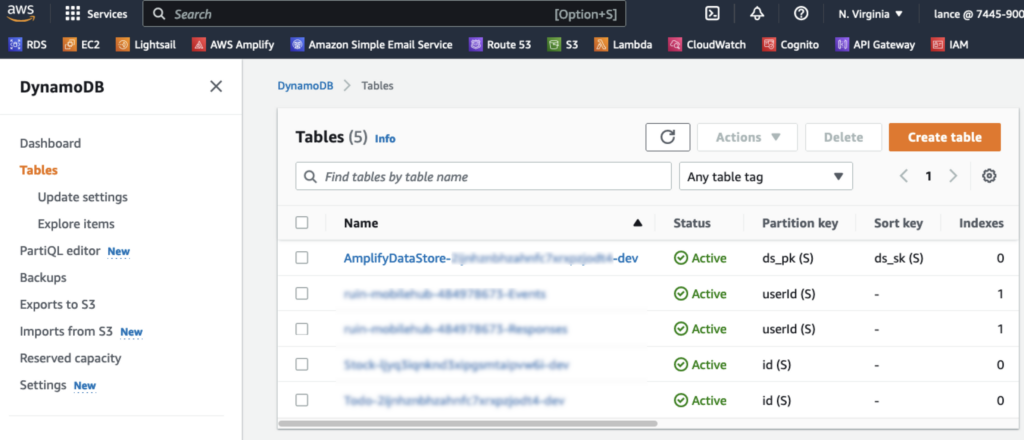
You can go to the DynamoDB service in your AWS console to see the table that was created: