
Starting A New App On Amplify
Building on the successful test project as noted in the React App On AWS : Amplify Training Notes post, it is time to start a new project. This time it is going to be iterated over until we get a rudimentary SaaS application up-and-running.
This project is built using WebStorm 2023.2 on MacOS Venture 13.4.1 with node , npm, and AWS CLI already installed.
Create a new WebStorm project – this one has been named “Stocker”.
The command boxes are assuming a terminal window from the initial project directory.
Setup The React App & Amplify Environment
Let the React create app NPM script setup our initial app code, then configure amplify.
npx create app stocker
amplify configure
amplify upgrade
With amplify configure you’ll
- Login to AWS
- Answer some prompts on the console that will open new AWS web browser windows.
- Add a user: stocker_amplify_user
- Add user to group: react-amplify-apps (we created this in our other Amplify tutorials)
- In the browser go to IAM > Users and click on that new user > Security Credentials tab
Click create access key
Select CLI use case
you’ll need to add an access key (make sure you copy the secret key, you’ll only see it once)
- Allow the defaults for the rest of the prompts
- Add a user: stocker_amplify_user
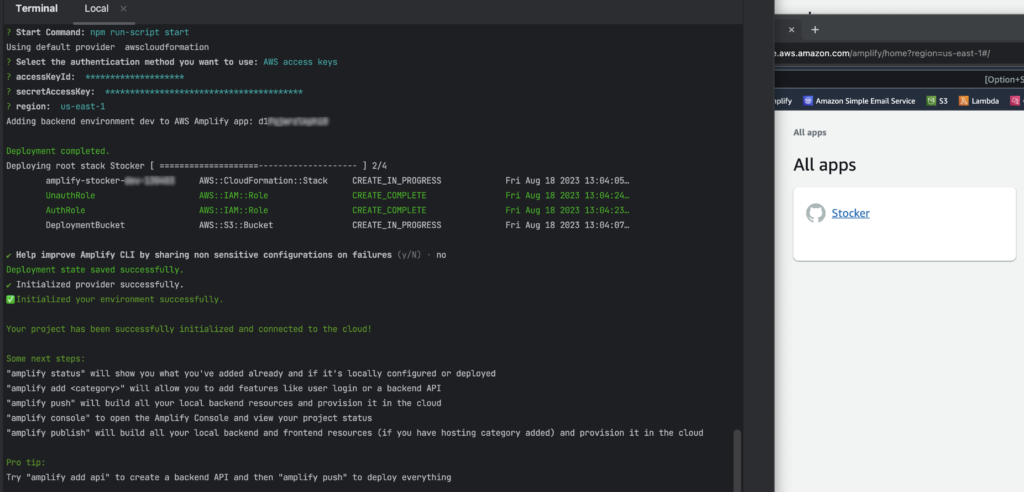
Initialize The New App On Amplify
cd stocker
amplify init
With amplify init you’ll setup some project info and in turn amplify CLI will create a starter backend for the project, and get it pushed up to the cloud.
- Project Name: Stocker
- Change defaults:
- Change the IDE to IntelliJ Studio
- Change access mode to : Access Key
- Paste the access key and secret key from when you created the user in the above amplify console run
Add AWS Cognito Authentication
amplify add authThis adds the user authentication and management to the app via AWS Cognito.
- Default configuration
- Sign in method: email
To leverage this authentication via AWS Cognito, our React App needs to be made “AWS aware” via some code updates.
Edit src/index.js
// -- Default Create Create App libs
import React from 'react';
import ReactDOM from 'react-dom/client';
import './index.css';
import App from './App';
import reportWebVitals from './reportWebVitals';

// -- Amplify specific libs
// Add amplify libs to default creat react app template
import { Amplify } from 'aws-amplify';
import config from './aws-exports';
Amplify.configure(config);

// -- Standard Create React App DOM connection to create the SPA
const root = ReactDOM.createRoot(document.getElementById('root'));
root.render(
  <React.StrictMode>
    <App />
  </React.StrictMode>
);

reportWebVitals();
Edit src/App.js
import logo from "./logo.svg";
import "@aws-amplify/ui-react/styles.css";
import {
  withAuthenticator,
  Button,
  Heading,
  Image,
  View,
  Card,
} from "@aws-amplify/ui-react";

function App({ signOut }) {
  return (
      <View className="App">
        <Card>
          <Image src={logo} className="App-logo" alt="logo" />
          <Heading level={1}>Welcome to Stocker</Heading>
        </Card>
        <Button onClick={signOut}>Sign Out</Button>
      </View>
  );
}

// -- Wrap our app in the AWS Authentication lib
// this will control app access via the AWS lib
// in our case we've configured it to use Cognito, so that AWS service will be the main driver here
export default withAuthenticator(App);
Edit src/package.json
Include the amplify libs.
{
  "name": "stocker",
  "version": "0.1.0",
  "private": true,
  "dependencies": {
    "@aws-amplify/ui-react": "^5.2.0",
    "@testing-library/jest-dom": "^5.17.0",
    "@testing-library/react": "^14.0.0",
    "@testing-library/user-event": "^14.4.3",
    "aws-amplify": "^5.3.10",
    "react": "^18.2.0",
    "react-dom": "^18.2.0",
    "react-scripts": "5.0.1",
    "web-vitals": "^3.4.0"
  },
  "devDependencies": {
    "@babel/plugin-proposal-private-property-in-object": "^7.21.11"
  },
  "scripts": {
    "start": "react-scripts start",
    "build": "react-scripts build",
    "test": "react-scripts test",
    "eject": "react-scripts eject"
  },
  "eslintConfig": {
    "extends": [
      "react-app",
      "react-app/jest"
    ]
  },
  "browserslist": {
    "production": [
      ">0.2%",
      "not dead",
      "not op_mini all"
    ],
    "development": [
      "last 1 chrome version",
      "last 1 firefox version",
      "last 1 safari version"
    ]
  }
}
Create & Update Git repo
Webstorm is already configured to connect to github via an authorized user cache.
In Webstorm choose “git” from the main menu then “Github” and “Share this project”. This will create the git repo.
From the same git menu choose “commit”, enter a message the change the button to “commit and push” to send the initial files to GitHub.
Add Amplify Hosting
This will setup a hosted front end (FE) for the app and connect it to the GitHub repo for CI/CD.
amplify hosting addThis will open a browser window on the Amplify interface to complete connecting the GitHub repo to the Amplify hosting environnment:
- Plugin module: hosting with Amplify Console
- Type: Continuous deployment
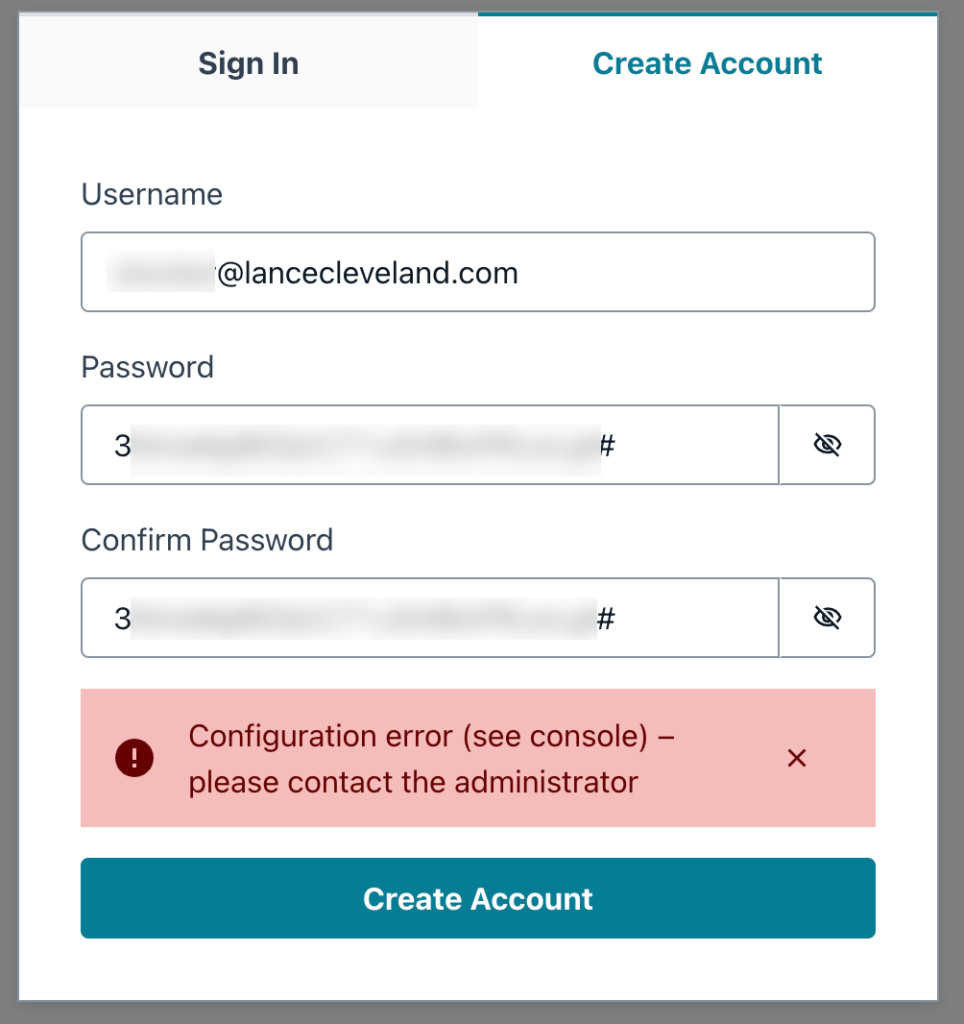
Running The App
Log into the AWS Amplify Console and follow the URL to the front end.
Note: this is generating an configuration error when trying to create a user account (via Cognito).
Setup Amplify Studio
Amplify Studio allows you to configure backend options via a web interface.
Login to AWS Amplify console. Go to the backend and enable Amplify Studio. When it is setup you can go back to the Backend tab on the Amplify app and click “Launch Studio”. From here you can configure and update the Auth project.
Here you can configure the Cognito authentication details like the verification email message header and content.
When saved use the Amplify CLI on the terminal window in the project to pull the config back to the local dev box.
amplify pull --appId d1fqjwrzlkphi0 --envName devNO change…
Add an API connection
amplify add api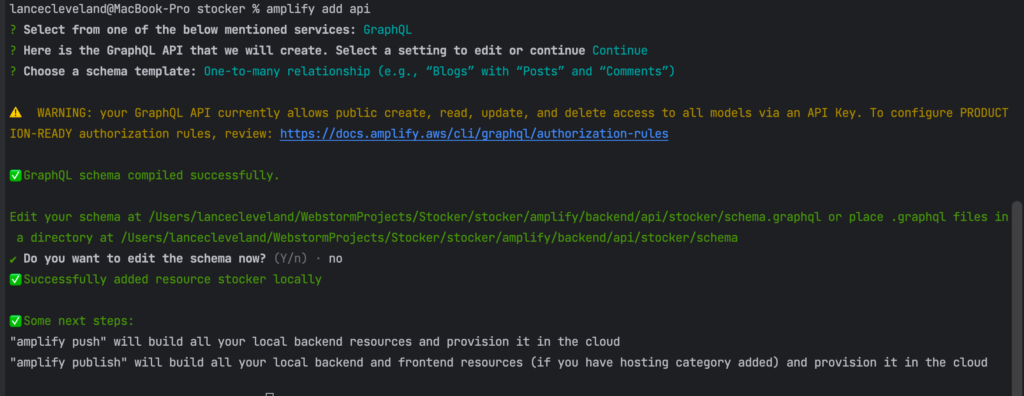
Publish
This will build and push the FE and BE to the AWS Amplify service in the cloud.
amplify publish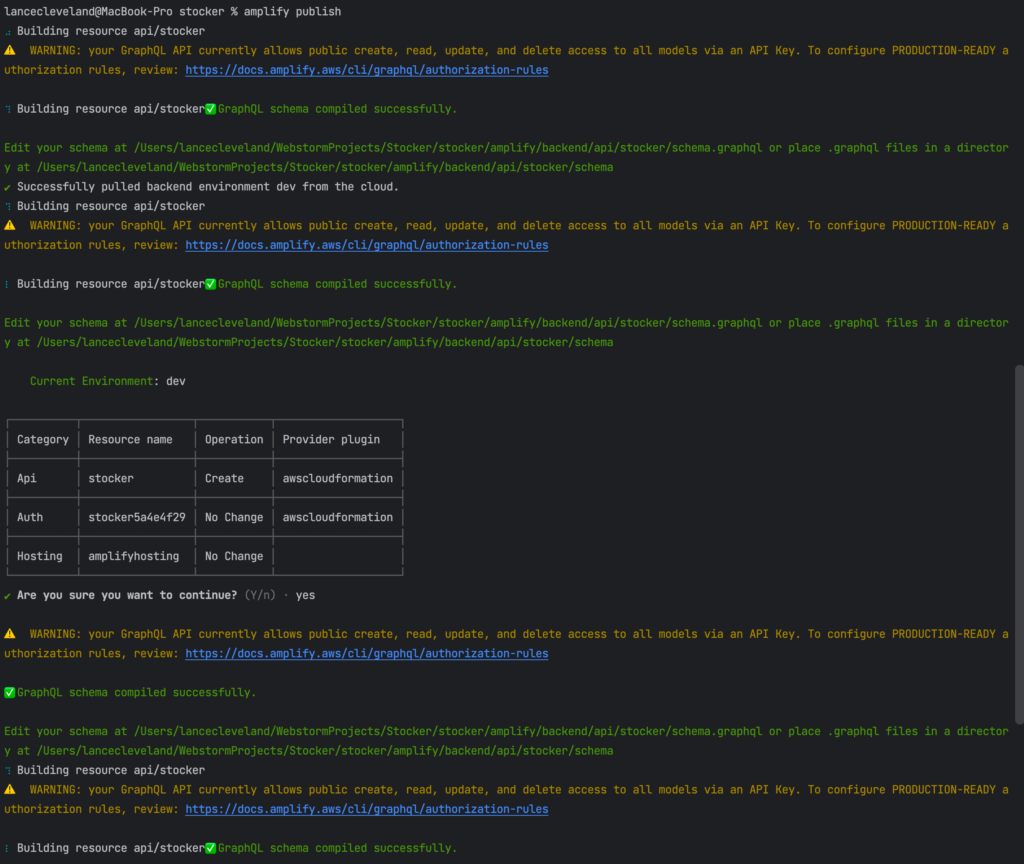
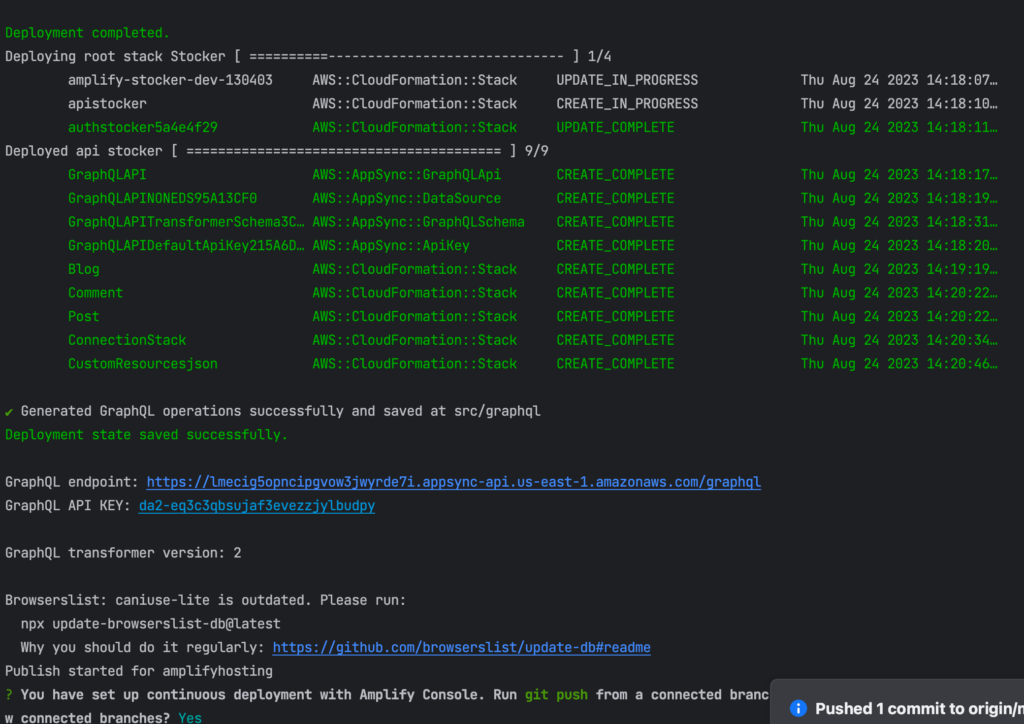
Update Repo
With all the updates provided via Amplify CLI, use the git tools in WebStorm and commit/push the latest code changes. This will add a backend folder and some basic GraphQL files to the project.
After the push is complete the Amplify host will update and build the FE and BE.
The login now works — likely due to a commit from the repo NOT by adding GraphQL — that is something to test on the next iteration of Amplify app building.
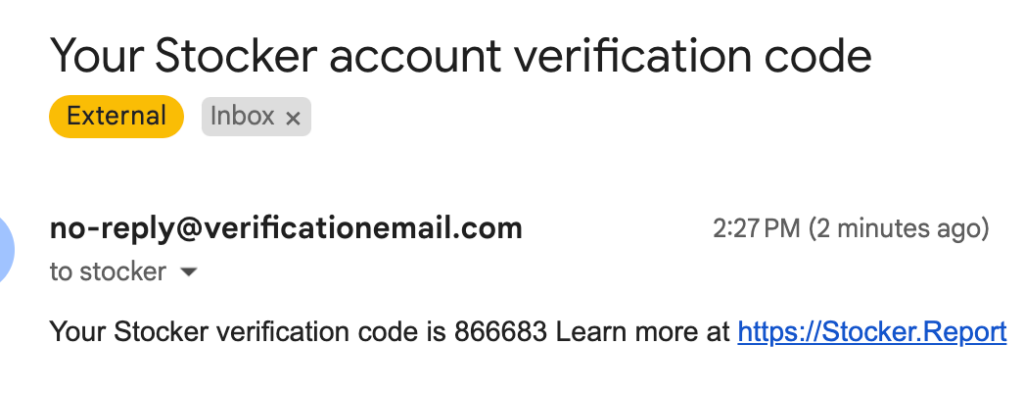
We now have our new account verification email:
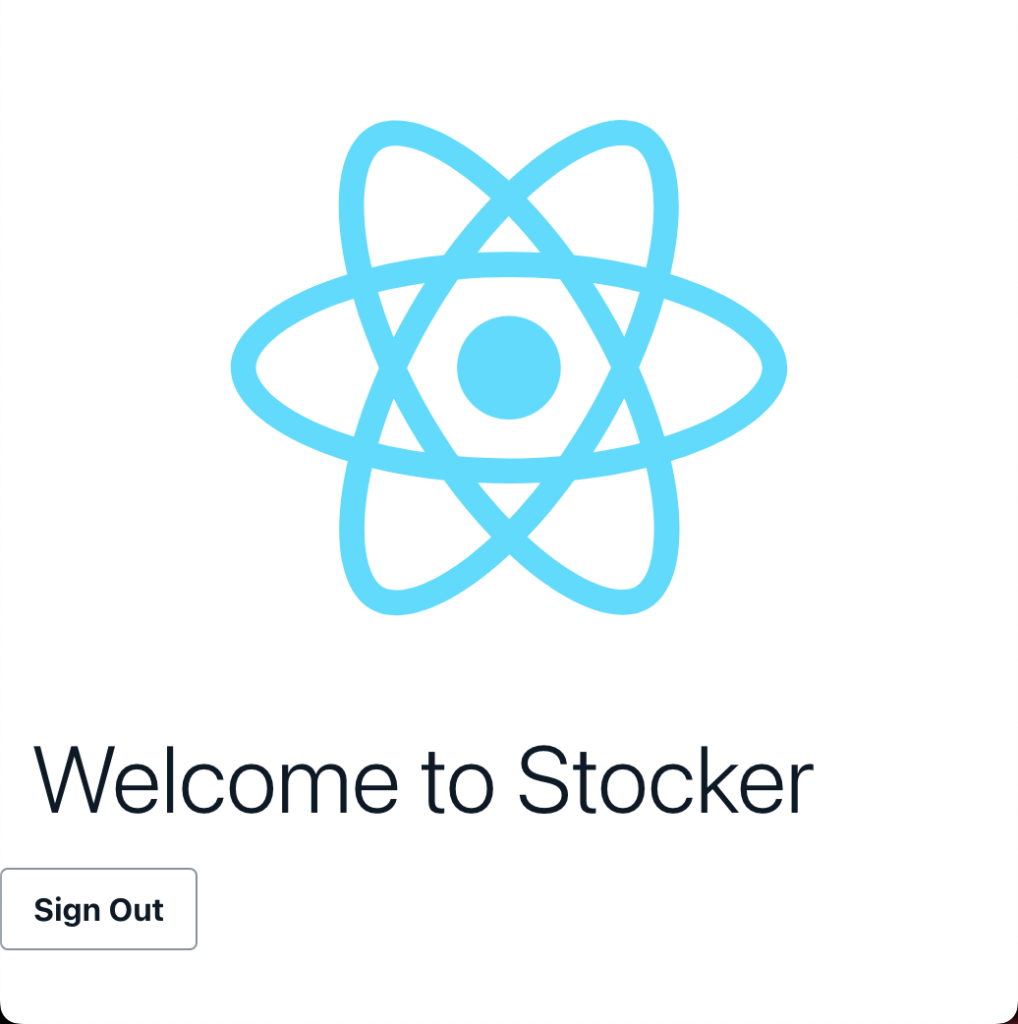
And our rudimentary placeholder React app are setup:
Success with the second attempt starting a new app on amplify