
React App On AWS : Amplify Training Notes
AWS has some great tools that make building and deploying React Apps easier than doing the standard local development with later deployment to the AWS cloud. Amplify combined with multiple services can make this easier. Before refining the process, I’m re-visiting the basics via AWS Training.
In my environment I am using the new-and-improved (it really is) version of WebStorm 2023.2, already have a working React + NPM + NPX environment setup. I also have a GitHub account and an AWS account with Amplify setup and ready-to-go. I am working on a MacBook Pro and the screen shots reflect that.
These are my initial notes.
Starting here:
https://aws.amazon.com/getting-started/hands-on/build-react-app-amplify-graphql/
Getting Started : Deploy and Host React On Amplify
Create A New React App
npx create-react-app amplifyapp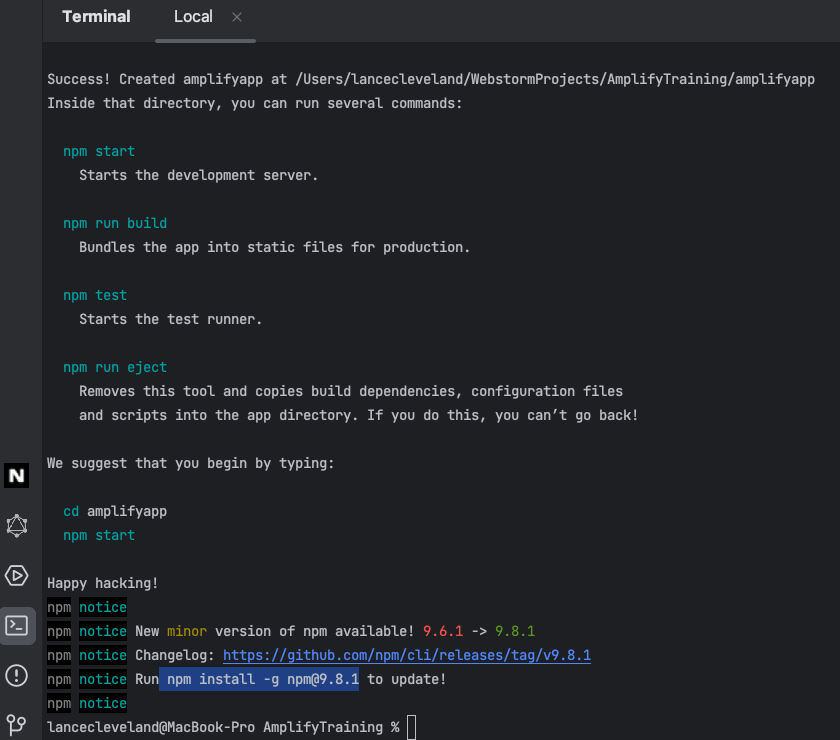
sudo npm install -g npm@9.8.1 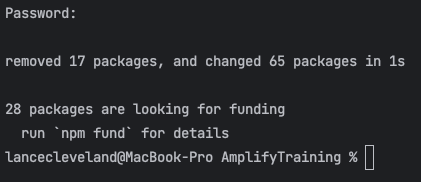
cd amplifyapp
npm start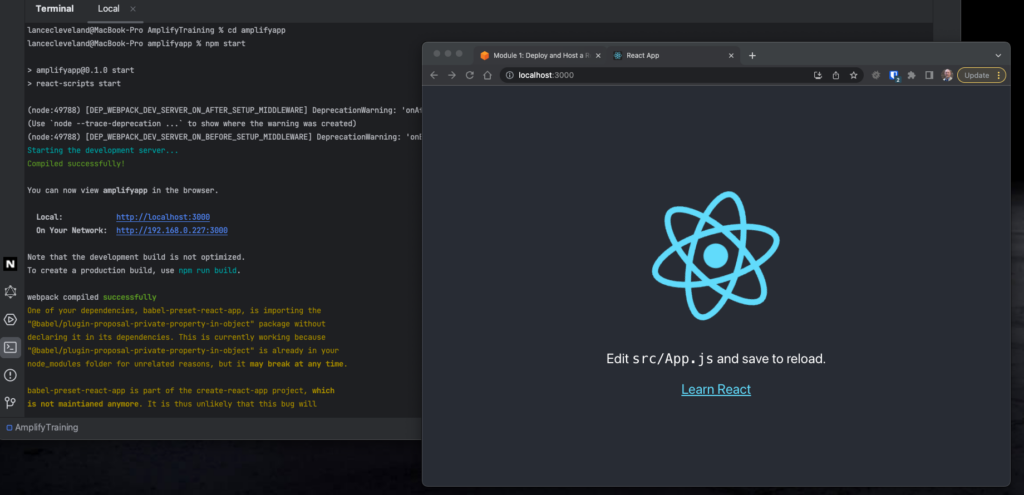
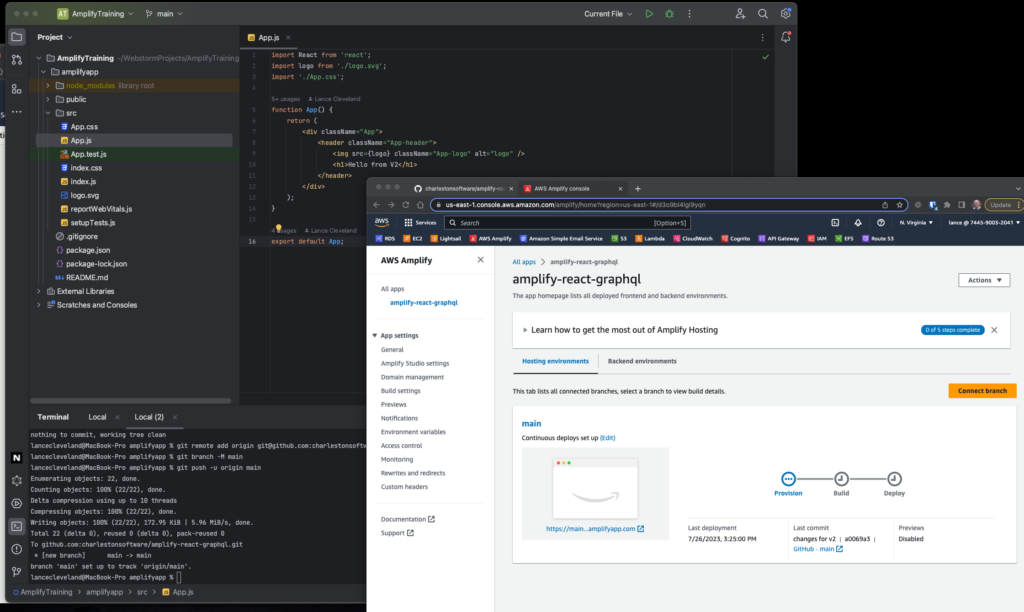
Initialize a new GitHub repo, go to: https://github.com/new , fill out the form adding the app name “amplify-react-graphql” and leave the rest as defaults.
In Webstorm, go to the new Create React App Root and open a new terminal there.
git init
git add .
git commit -m "initial commit"
git remote add origin git@github.com:charlestonsoftware/amplify-react-graphql.git
git branch -M main
git push -u origin main

Login to AWS Management Console and go to the AWS Amplify service console.
Go to “New App” , “Host web app”, and select “From Existing Code” with the GitHub option.
This will open the GitHub web auth interface, allow AWS to interact with GitHub.
Pick the repo (amplify-react-graphql) , leave the branch as main, click Next.
Keep the default build settings on the Amplify console.
Build & Deploy.

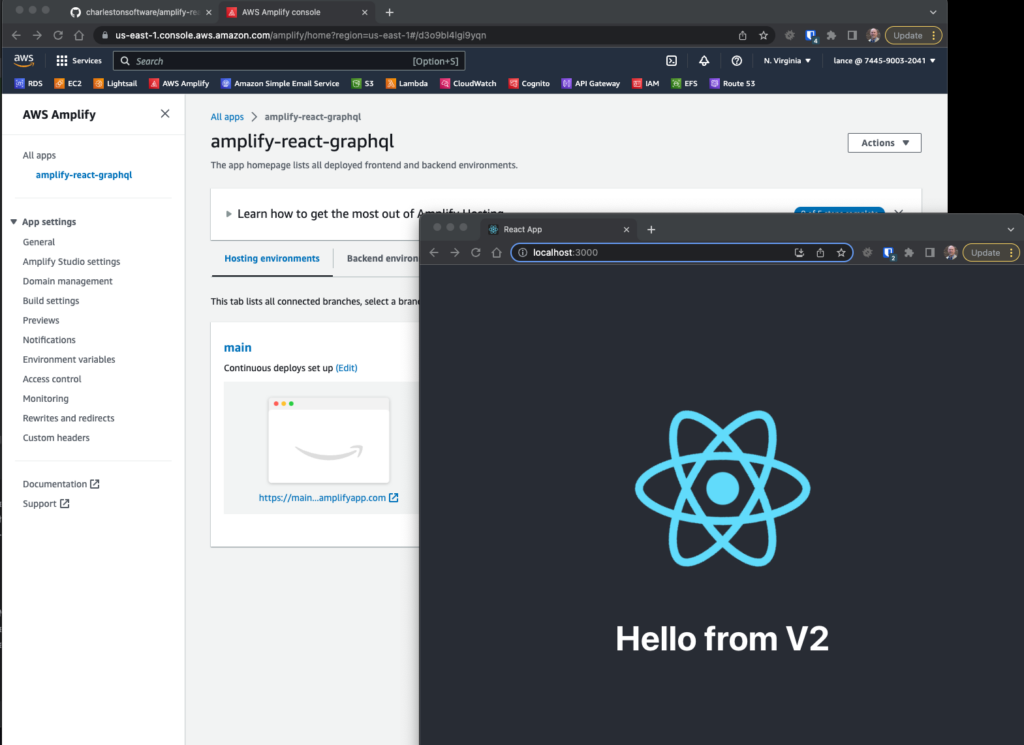
Test Automatic Change Deployment
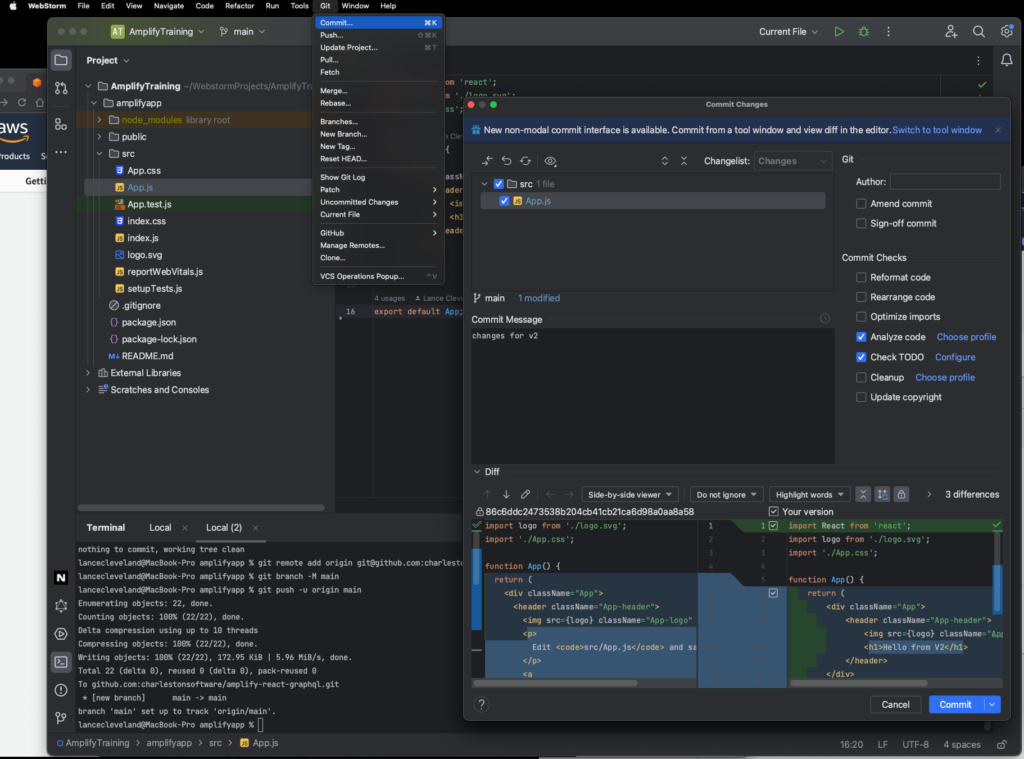
Edit the App.js file to change the <Header> block and invoke a basic text change.
Select “git” from the WebStorm menu, choose commit, and make sure App.js is checked.
Add the comment, the select “commit an push” as the action button option.
Amplify with start to automatically rebuild the app and deploy it when ready.
When it finishes deployment, the running app window should auto-refresh…
Install Amplify CLI and Localize Amplify
Setting Up the CLI and Amplify/IAM User
In the same terminal window use to do the prior round of git commit and push commands (prior to using the built-in WebStorm menu-driven UI for that process) , install Amplify CLI globally as a Node script. Then configure the CLI.
npm install -g @aws-amplify/cli
amplify configure
This opens the AWS console in a new browser window. Go back to the command line app that is running and press <Enter> to continue.
Answer the prompt to specify the region.
After doing so the CLI will open a browser window on the AWS Console IAM interface on the create new user page (this differs from the video in the tutorial). Create the new user “amplify-user”, and keep the defaults for everything else.
Click “next” through the next 2 screens.
This will create the user but DOES NOT create the access keys (this is also different than the video).
Go to the “users” screen in IAM , or click the “view new user” dialog prompt when the in-browser alert comes up.
Go to the Access keys section. Create a new access key. Select “CLI” as the use case. It will warn you about “Alternatives Recommended” such as AWS CloudShell (a browser-based CLI) and AWS CLI V2 (enables authentication through a user in IAM Identity Center). Likely that second option is a better choice, but for now we’ll click the “I understand … and will ignore (paraphrasing) … these recommendations.” Click Next. Click “Create Access Key”.
Copy your Access Key and Secret Access Key. Maybe download the CSV with credentials as you’ll never see this secret access key again and you’ll need it.
Go back to the console and press enter. Add the Access Key , hit enter. Add the Secret Access Key and hit enter.
Leave the profile name “default” and press enter.
Set Up The Amplify Backend For This App
Go to the AWS Console and the amplify-react-graphsql app.
Click Backend Environments and click “Get Started”.
When the environment finishes building, go to the AWS Console / Backend Environments for this app and click “Launch Studio”.
Go back to the “Local setup instructions” under that Launch Studio button. Copy this command and past it into the terminal window where we ran the git CLI and AWS CLI commands earlier.
In the browser window , allow CLI access. Now follow the prompts on the terminal.
For the “IDE” (editor) prompt, I chose IntelliJ IDEA (seems like the closest fit).
Select the defaults for the rest of the prompts.
My browser list in the browserslist NPM app was outdated, so run the NPM command to update that:
npx update-browserslist-db@latest
Now re-open AWS console.
amplify consoleSelect AWS console from the list.
Add Authentication To Our React App on AWS
Go back to the same CLI window and run the npm command to install our ui-react libs, then start the process to add amplify authentication to our app:
npm install aws-amplify @aws-amplify/ui-react
amplify add auth
Here the lesson once again does not match the documentation online:
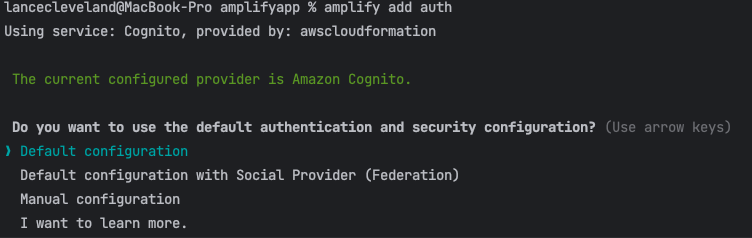
Choose Default configuration (via Cognito), then select username as the sign-in method and choose “No I am done.” when prompted for additional configuration settings.
Now push this to the cloud via the amplify push –y command:

Update The App Code To Add AWS Authentication
Update src/index.js to add Amplify libs and config
import React from 'react';
import ReactDOM from 'react-dom/client';
import './index.css';
import App from './App';
import reportWebVitals from './reportWebVitals';
import { Amplify } from 'aws-amplify';
import config from './aws-exports';
Amplify.configure(config);


const root = ReactDOM.createRoot(document.getElementById('root'));
root.render(
  <React.StrictMode>
    <App />
  </React.StrictMode>
);

// If you want to start measuring performance in your app, pass a function
// to log results (for example: reportWebVitals(console.log))
// or send to an analytics endpoint. Learn more: https://bit.ly/CRA-vitals
reportWebVitals();
Update src/App.js with the authentication wrapper
import logo from "./logo.svg";
import "@aws-amplify/ui-react/styles.css";
import {
  withAuthenticator,
  Button,
  Heading,
  Image,
  View,
  Card,
} from "@aws-amplify/ui-react";

function App({ signOut }) {
  return (
    <View className="App">
      <Card>
        <Image src={logo} className="App-logo" alt="logo" />
        <Heading level={1}>We now have Auth!</Heading>
      </Card>
      <Button onClick={signOut}>Sign Out</Button>
    </View>
  );
}

export default withAuthenticator(App);
Test The Authentication Functionality
The app that is already running from the first window we started should auto-update and show the new user authentication interface. If not you can run “npm start” in the terminal window to bring the app up.
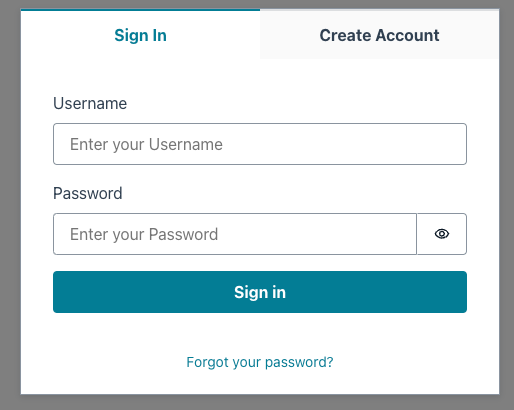
Click “Create Account” tab and create an account.
Put in a valid email as a confirmation code will be sent for testing the app. When it is received, enter the auth code — the app will talk to Cognito and respond once the code is verified:

Update Build Settings
Open the AWS Amplify Console, go to App Settings / Build Settings in the sidebar.
Edit the YAML file on the website and put these in there:
version: 1
backend:
  phases:
    build:
      commands:
        - '# Execute Amplify CLI with the helper script'
        - amplifyPush --simple
frontend:
  phases:
    preBuild:
      commands:
        - yarn install
    build:
      commands:
        - yarn run build
  artifacts:
    baseDirectory: build
    files:
      - '**/*'
  cache:
    paths:
      - node_modules/**/*
Scroll down and edit the “Build Image Settings”.
Select “Add Package Override” and select “Amplify CLI”.
The tutorial does not specify, but I clicked “Save” here to save those settings.
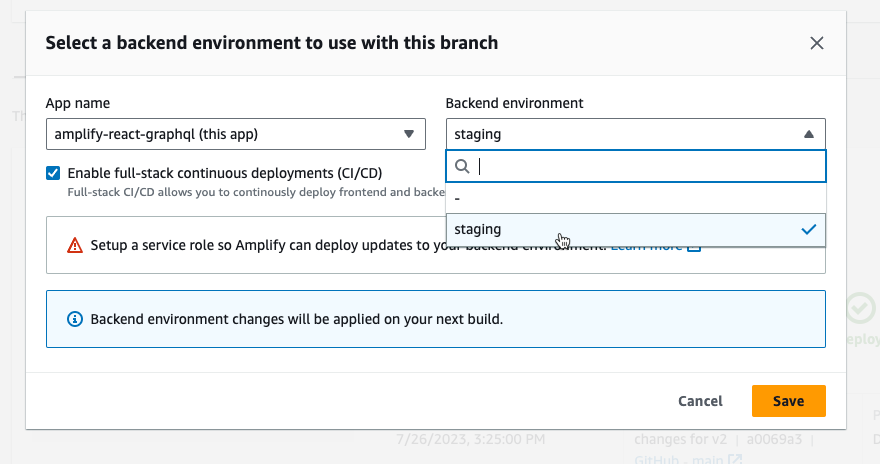
Attach the backend environment to the front end (hosting environment)
This part of the documentation was confusing AF because they missed some steps.
Go the to AWS Amplify console and click on the app (*amplify-react-graphql”).
Click the “Hosting environments” tab.
Click (Edit) next to Continuous deploys set up.

Now attach the staging backend you’ve created.
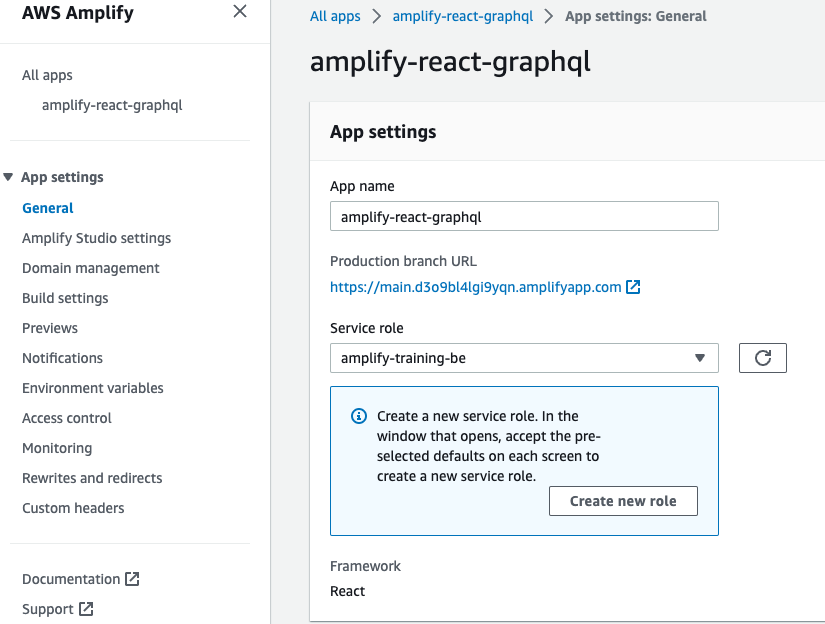
Setting Up IAM Backend Role For Amplify
Now you need to create an IAM role for this stuff. Go to the AWS Console IAM Roles screen.
Keep AWS Service selected.
Under use cases select “Amplify” from “Use cases for other AWS services:” and check Amplify- Backend Development.

ON the name and review screen give this role a name “amplify-training-be” and save/create this role.
Go back to the Amplify main console screen. Under App settings | general
Click “Edit” on the top-right corner.
In the App Settings box, set the role to the named role you specified above and save.
Commit and Deploy To Production
In WebStorm go to the git | commit menu, add a comment, then click “commit and push”. This will updated the hosted production app on Amplify.
Add An API And Database
Leverage AWS GraphQL API against AWS AppSync with storing data in the NoSQL Amazon DynamoDB persistent data store.
Open that CLI terminal window and add the API librarires…
amplify add apiChoose GraphQL (default) and the other defaults for this setup, give the object a name of “amplifyreactgraphql”
When it finishes there should be an amplify directory in the project folder with the GraphSQL schema files.
Update /amplify/backend/api/amplifyreactgraphql/schema.graphql (this does NOT match the doc notes) to match this schema:
# This "input" configures a global authorization rule to enable public access to
# all models in this schema. Learn more about authorization rules here: https://docs.amplify.aws/cli/graphql/authorization-rules
input AMPLIFY { globalAuthRule: AuthRule = { allow: public } } # FOR TESTING ONLY!

type Note @model @auth(rules: [ { allow: public } ] ){
  id: ID!
  name: String!
  description: String
}
Go back to the terminal window for the CLI and fire up the console:
amplify push --y
amplify console api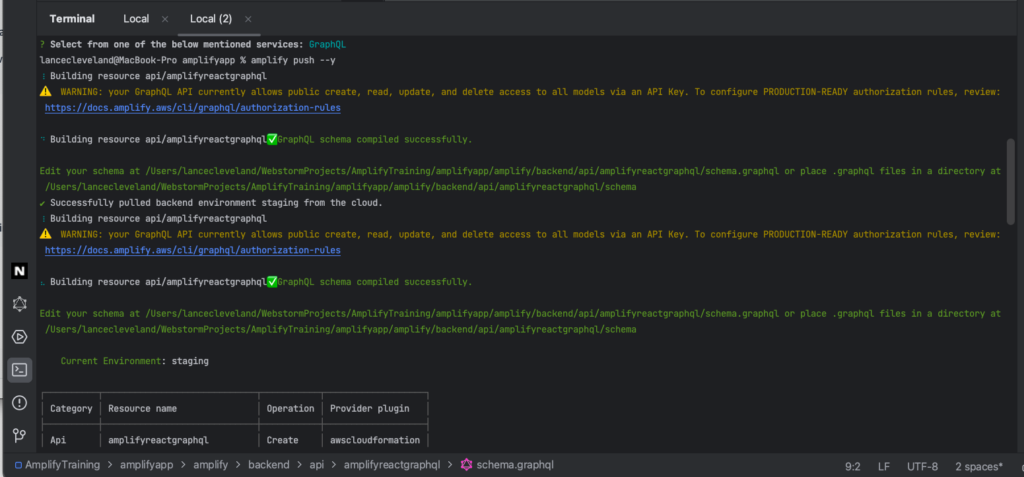
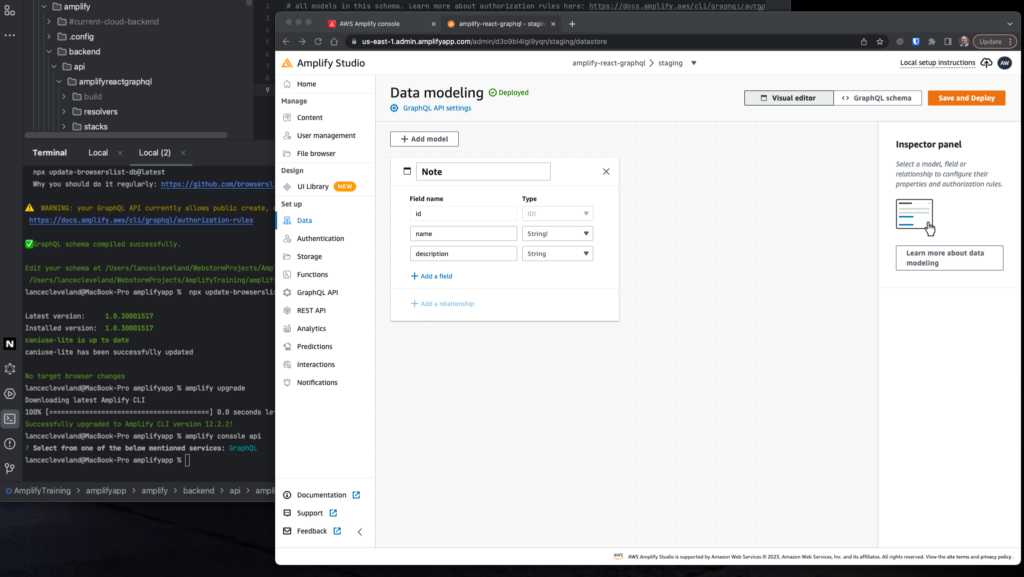
The amplify console api command will fire up a browser window where you can see a graphical representation of your data structure:
Update The Code To Use The API (and GraphQL)
Edit src/App.js
import React, { useState, useEffect } from "react";
import "./App.css";
import "@aws-amplify/ui-react/styles.css";
import { API } from "aws-amplify";
import {
Button,
Flex,
Heading,
Text,
TextField,
View,
withAuthenticator,
} from "@aws-amplify/ui-react";
import { listNotes } from "./graphql/queries";
import {
createNote as createNoteMutation,
deleteNote as deleteNoteMutation,
} from "./graphql/mutations";
const App = ({ signOut }) => {
const [notes, setNotes] = useState([]);
useEffect(() => {
fetchNotes();
}, []);
async function fetchNotes() {
const apiData = await API.graphql({ query: listNotes });
const notesFromAPI = apiData.data.listNotes.items;
setNotes(notesFromAPI);
}
async function createNote(event) {
event.preventDefault();
const form = new FormData(event.target);
const data = {
name: form.get("name"),
description: form.get("description"),
};
await API.graphql({
query: createNoteMutation,
variables: { input: data },
});
fetchNotes();
event.target.reset();
}
async function deleteNote({ id }) {
const newNotes = notes.filter((note) => note.id !== id);
setNotes(newNotes);
await API.graphql({
query: deleteNoteMutation,
variables: { input: { id } },
});
}
return (
<View className="App">
<Heading level={1}>My Notes App</Heading>
<View as="form" margin="3rem 0" onSubmit={createNote}>
<Flex direction="row" justifyContent="center">
<TextField
name="name"
placeholder="Note Name"
label="Note Name"
labelHidden
variation="quiet"
required
/>
<TextField
name="description"
placeholder="Note Description"
label="Note Description"
labelHidden
variation="quiet"
required
/>
<Button type="submit" variation="primary">
Create Note
</Button>
</Flex>
</View>
<Heading level={2}>Current Notes</Heading>
<View margin="3rem 0">
{notes.map((note) => (
<Flex
key={note.id || note.name}
direction="row"
justifyContent="center"
alignItems="center"
>
<Text as="strong" fontWeight={700}>
{note.name}
</Text>
<Text as="span">{note.description}</Text>
<Button variation="link" onClick={() => deleteNote(note)}>
Delete note
</Button>
</Flex>
))}
</View>
<Button onClick={signOut}>Sign Out</Button>
</View>
);
};
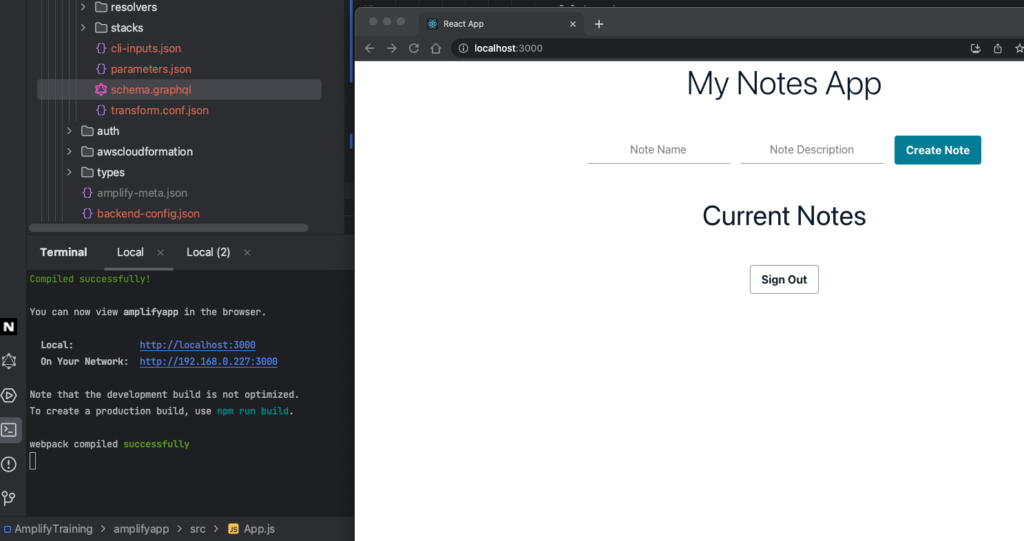
export default withAuthenticator(App);If you still have your npm start version of the React App up-and-running it will auto-update to show the new Notes app.
Last Item : Add Persistent Data Store
Again the docs is a bit misleading… the prior steps added the GraphQL setup including the API and data definition and published the scheme to GraphSQL on AWS. It did NOT setup the DynamoDB which is the persistent data store. We will want that if we want data to “live” beyond a browser session.
Go back to the terminal for the CLI:
amplify add storageSelected service: Content
Friendly Name: amplifytrainingstorage
S3 Bucket Name: amplifytrainingbucket
Access: Auth users only
Kind of access (space bar to select each): Create/Update, Read, Delete
Lamba trigger: No
Update the GraphSQL schema file: amplifyapp/amplify/backend/api/amplifyreactgraphql/schema.graphql to be this:
# This "input" configures a global authorization rule to enable public access to
# all models in this schema. Learn more about authorization rules here: https://docs.amplify.aws/cli/graphql/authorization-rules
input AMPLIFY { globalAuthRule: AuthRule = { allow: public } } # FOR TESTING ONLY!

type Note @model @auth(rules: [ { allow: public } ] ){
  id: ID!
  name: String!
  description: String
  image: String
}
Go back to the CLI terminal an push it to AWS:
amplify push --yUpdate the src/App.js to add image support via the S3 bucket:
import React, { useState, useEffect } from "react";
import "./App.css";
import "@aws-amplify/ui-react/styles.css";
import { API, Storage } from 'aws-amplify';
import {
    Button,
    Flex,
    Heading,
    Image,
    Text,
    TextField,
    View,
    withAuthenticator,
} from '@aws-amplify/ui-react';
import { listNotes } from "./graphql/queries";
import {
    createNote as createNoteMutation,
    deleteNote as deleteNoteMutation,
} from "./graphql/mutations";


const App = ({ signOut }) => {
    const [notes, setNotes] = useState([]);

    useEffect(() => {
        fetchNotes();
    }, []);

    async function fetchNotes() {
        const apiData = await API.graphql({ query: listNotes });
        const notesFromAPI = apiData.data.listNotes.items;
        await Promise.all(
            notesFromAPI.map(async (note) => {
                if (note.image) {
                    const url = await Storage.get(note.name);
                    note.image = url;
                }
                return note;
            })
        );
        setNotes(notesFromAPI);
    }
    async function createNote(event) {
        event.preventDefault();
        const form = new FormData(event.target);
        const image = form.get("image");
        const data = {
            name: form.get("name"),
            description: form.get("description"),
            image: image.name,
        };
        if (!!data.image) await Storage.put(data.name, image);
        await API.graphql({
            query: createNoteMutation,
            variables: { input: data },
        });
        fetchNotes();
        event.target.reset();
    }

    async function deleteNote({ id, name }) {
        const newNotes = notes.filter((note) => note.id !== id);
        setNotes(newNotes);
        await Storage.remove(name);
        await API.graphql({
            query: deleteNoteMutation,
            variables: { input: { id } },
        });
    }

    return (
        <View className="App">
            <Heading level={1}>My Notes App</Heading>
            <View as="form" margin="3rem 0" onSubmit={createNote}>
                <Flex direction="row" justifyContent="center">
                    <TextField
                        name="name"
                        placeholder="Note Name"
                        label="Note Name"
                        labelHidden
                        variation="quiet"
                        required
                    />
                    <TextField
                        name="description"
                        placeholder="Note Description"
                        label="Note Description"
                        labelHidden
                        variation="quiet"
                        required
                    />
                    <View
                        name="image"
                        as="input"
                        type="file"
                        style={{ alignSelf: "end" }}
                    />
                    <Button type="submit" variation="primary">
                        Create Note
                    </Button>
                </Flex>
            </View>
            <Heading level={2}>Current Notes</Heading>
            <View margin="3rem 0">
                {notes.map((note) => (
                    <Flex
                        key={note.id || note.name}
                        direction="row"
                        justifyContent="center"
                        alignItems="center"
                    >
                        <Text as="strong" fontWeight={700}>
                            {note.name}
                        </Text>
                        <Text as="span">{note.description}</Text>
                        {note.image && (
                            <Image
                                src={note.image}
                                alt={`visual aid for ${notes.name}`}
                                style={{ width: 400 }}
                            />
                        )}
                        <Button variation="link" onClick={() => deleteNote(note)}>
                            Delete note
                        </Button>
                    </Flex>
                ))}
            </View>
            <Button onClick={signOut}>Sign Out</Button>
        </View>
    );
};

export default withAuthenticator(App);
Commit to git, include the App.js update and ./amplify/ folder that was added earlier. Push to main (to update the Amplify codebase).
Clean Up
That completes the initial “follow along” with notes for create a React App On AWS via Amplify.
To clean up run this command in the terminal CLI to remove the amplify project and resources (will not remove the GitHub repos):
amplify deleteSummary & Resources
That’s it — this training project sets up a fully functional React app on AWS Amplify by using their CLI and API libraries. A little JavaScript code and a GraphSQL schema drive these commands. There is not a lot of documentation provided, so in a future article I’ll be diving into exactly what this sample “Training Notes App” does and does not do. Out of the box it does take on a huge chunk of user management thanks to what appears to be a well-crafted almost-turn-key user management system via AWS Cognito. It also wires up some fairly rudimentary binary file storage via AWS S3 buckets. It does NOT seem to handle independent state management between users and thus shares everything with all users on the data stack side. Overall not bad for a quick one-hour stand up with minimal coding effort.
You can view the code for this article on my public GitHub repo: https://github.com/charlestonsoftware/amplify-react-graphql
I hope to be writing some future articles on this soon that expands on the notes here, first with a simplified run-through that goes “straight to the end game” in as few steps as possible. It will also note the inconsistencies with the AWS training as of July 2023 to allow for a quick “boot up” of the project.
One thought on “React App On AWS : Amplify Training Notes”