
Converting A Standalone Instance Into An EC2 Load Balanced Cluster
Creating a new web application that resides on an AWS load balanced cluster is easy with the Elastic Beanstalk assistant. That is a great solution if you want to run every web service or application on their own instances. It is not a great fit for complex environments like the one being used for Store Locator Plus®.
Store Locator Plus® has several environments running within the same master domain. Multiple servers and load balancers creates a security certificate nightmare. Not too mention it starts racking up EC2 server fees quickly if they each became their own cluster. The better option is to retain a server instance that allows us to run our SaaS offering, our buy-and-own plugin store, our documentation site, and our demo site from a single disk image. We want to setup a full EC2 Load Balanced Cluster to gain the benefits of horizontal scaling on a server hosting multiple domains and web apps.
While this is easy to do with a single EC2 instance that hosts multiple host names for the storelocatorplus.com domain, making it scalable under load is the trick. It turns out Elastic Beanstalk is not a good fit. Instead we need to build a load balanced cluster “from scratch”. We’ll need to combine a machine image from a running server with a Launch Template. We will need an Application Load Balancer that will have instances attached and detached automatically from an Auto Scaling Group that we will also create.
Our environment also has a configured EC2 instance to run the web application stacks, mostly WordPress, locally on an EBS volume that uses an Amazon Aurora MySQL RDS database in multiple zones for performance and reliability. These two features make it easy to replicate the disk image for the software portion and maintain a persistent DB store across all instances.
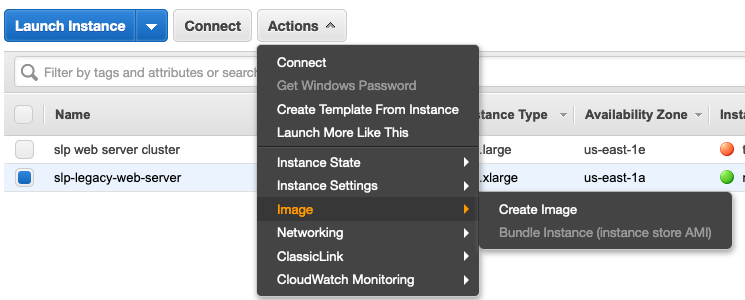
Create An Image From The EC2 Instance
- Go to the AWS EC2 services dashboard.
- Select the instance to use as the primary image from which to spawn all members of the cluster.
- Choose Image | Create Image and fill out the details so you can find this image later.
Create A Load Balancer
This will direct traffic to the instances that the autoscaling group will create.
Be sure to create an application load balancer. This will use Target Groups to organize instances that are attached to the application.
Create Launch Template
This is a fairly new AWS feature that is not “fully baked” into the interfaces. You will find a link to Launch Templates under Auto Scaling Groups when you go to create a new ASG.
Here is a direct link to view launch templates in US East 1 region (my default) — you can change the URL to match your default AWS region for your account:
https://console.aws.amazon.com/ec2/v2/home?region=us-east-1#LaunchTemplates
- Select the AMI you created earlier.
- Select instance type.
- DO use a key pair.
- Do not select an availability zone.
- Do not attach a network interface.
- Do provide a storage volume if you are using EBS instances (you should be).
- Do connect to security groups that allow web traffic. For SLP we also need to be in the security group to attach to our RDS web server.
Create An Autoscaling Group
- Go to the EC2 Dashboard and select Auto Scaling Group
- Choose Launch Template, select the template created above.
- Set your server capacity, should have 1 min and multiple max (4+) for horizontal scaling under load.
- Select your subnets, at least 2 are recommended.
- Leave classic load balancers blank.
- Set your target groups — this is how the scaling group attaches instances is starts and detaches instances it stops from the load balancer.
Create An EFS File Store
This will allow you to share uploaded files between the server instances that the autoscaling group may generate.
Create a new EFS using the AWS web interface.
Be sure to create a security group (or extend and existing one) to allow inbound traffic on the NFS port from the security group. I suggest a new security group so you can limit which servers and services can mount the EFS volume. In this case you only need a SINGLE inbound rule for NFS from the SG that contains your cluster servers.
For Ubuntu based systems you’ll need to mount the EFS volume with NFS. Install NFS Common.
# sudo apt install nfs-common
Create the mount point directory on your server and attach the EFS filesystem with the following command:
# sudo mount -t nfs4 -o nfsvers=4.1,rsize=1048576,wsize=1048576,hard,timeo=600,retrans=2,noresvport <your-fs-id>.efs.<your-efs-region:us-east-1>.amazonaws.com:/ efs
Tell your operating system to re-mount that NFS directory every time it boots by adding an entry to fstab like this:
<your-fs-id>.efs.<your-efs-region:us-east-1>.amazonaws.com:/ /mnt/efs nfs4 nfsvers=4.1,rsize=1048576,wsize=1048576,hard,timeo=600,retrans=2 0 0
Multiple Domain EFS
For multiple domains on the same server you’ll need separate upload directories. Create a directory under /mnt/efs for each site you will be hosting.
# mount --bind /mnt/efs/test.slp /var/www/test/wp-content/uploads
To get this to mount on every system boot add this to your fstab
<your-fs-id>.efs.<your-efs-region:us-east-1>.amazonaws.com:/test.slp /mnt/efs/test.slp /var/www/testsite/wp-content/uploads none defaults,bind 0 0
Next Steps
At this point we now have a scaling group that will restart our single EC2 server if it ever goes offline (our original EC2 standalone instance never has been offline in 4+ years of operation, other than for scheduled maintenance). Our persistent data store makes it easy to keep the user experience consistent when we start spinning up “clones” of the main server when load demands more throughput. The one piece we are missing for a WordPress-based applications, however, is the consistent storage of on-disk content — specifically the WordPress uploads directory.
We will address shared uploads in the next article when we employ Amazon’s Elastic Fileshare to manage our S3 content while presenting a simple way to attach those shares to a specific mount point and directory on our server.