Connecting JetBrains IDEs to OpenClaw Agents
Over the past couple of months, I’ve been busy working on creating highly customized AI agents. Most of these agents are running on a DGX Spark server. However, I have not been wiring these custom agents to my PhpStorm IDE, where I do most of my Store Locator Plus® work. In PhpStorm, I typically use the built-in AI agents such as Codex. Doing so and getting quality results has meant creating custom agent markdown files, as well as a stack of AI Assistant Rules that PhpStorm processes before sending requests to the AI models.
While working on other AI projects outside of Store Locator Plus®, it has become obvious that there are far more capabilities available when you have a structured set of permanent instruction files. OpenClaw provides this AI framework as a default configuration. OpenClaw not only supports the de facto AGENT.md standard, but also supports extensive chaining of these markdown files to create complex rule sets that the AI request can follow. My fellow AI researchers have found that this is an effective means of crafting highly specialized agents that excel at the tasks they are asked to perform.
On the Spark server, we now have a dozen agents that perform highly specialized tasks. For example, I have an app architect and app manager agent that not only define the scaffolding and framework for creating AI-centric apps, but can also create new app-specific agents in a matter of minutes that adhere to the standards that have been defined. The manager agent can also pass along instructions to the other agents on the Spark server. A change to the standards for the apps can be deployed across all agents as a change order with one command to one agent. This is a significant force multiplier.
Sadly, by using the built-in agents in PhpStorm or other JetBrains products such as AI Assistant, I lose much of that extended functionality. Like most AI-aware apps, PhpStorm is still limited to a single AGENT.md or CLAUDE.md file, skills files, and a custom stack for extended rules. This creates vendor lock-in, which I try to avoid on all projects. While it is far better than using a generic chat agent like ChatGPT on macOS or the web, it still means I lose control over my project-specific knowledge.
By using customized agents on the Spark, I have full control over the file set that drives the agent. This allows me to create Git repositories for each agent, creating a version history as well as a backup copy of these specialized agents. It is a standard format, such as markdown files, most of which can be ported to over a dozen other generic AI apps.
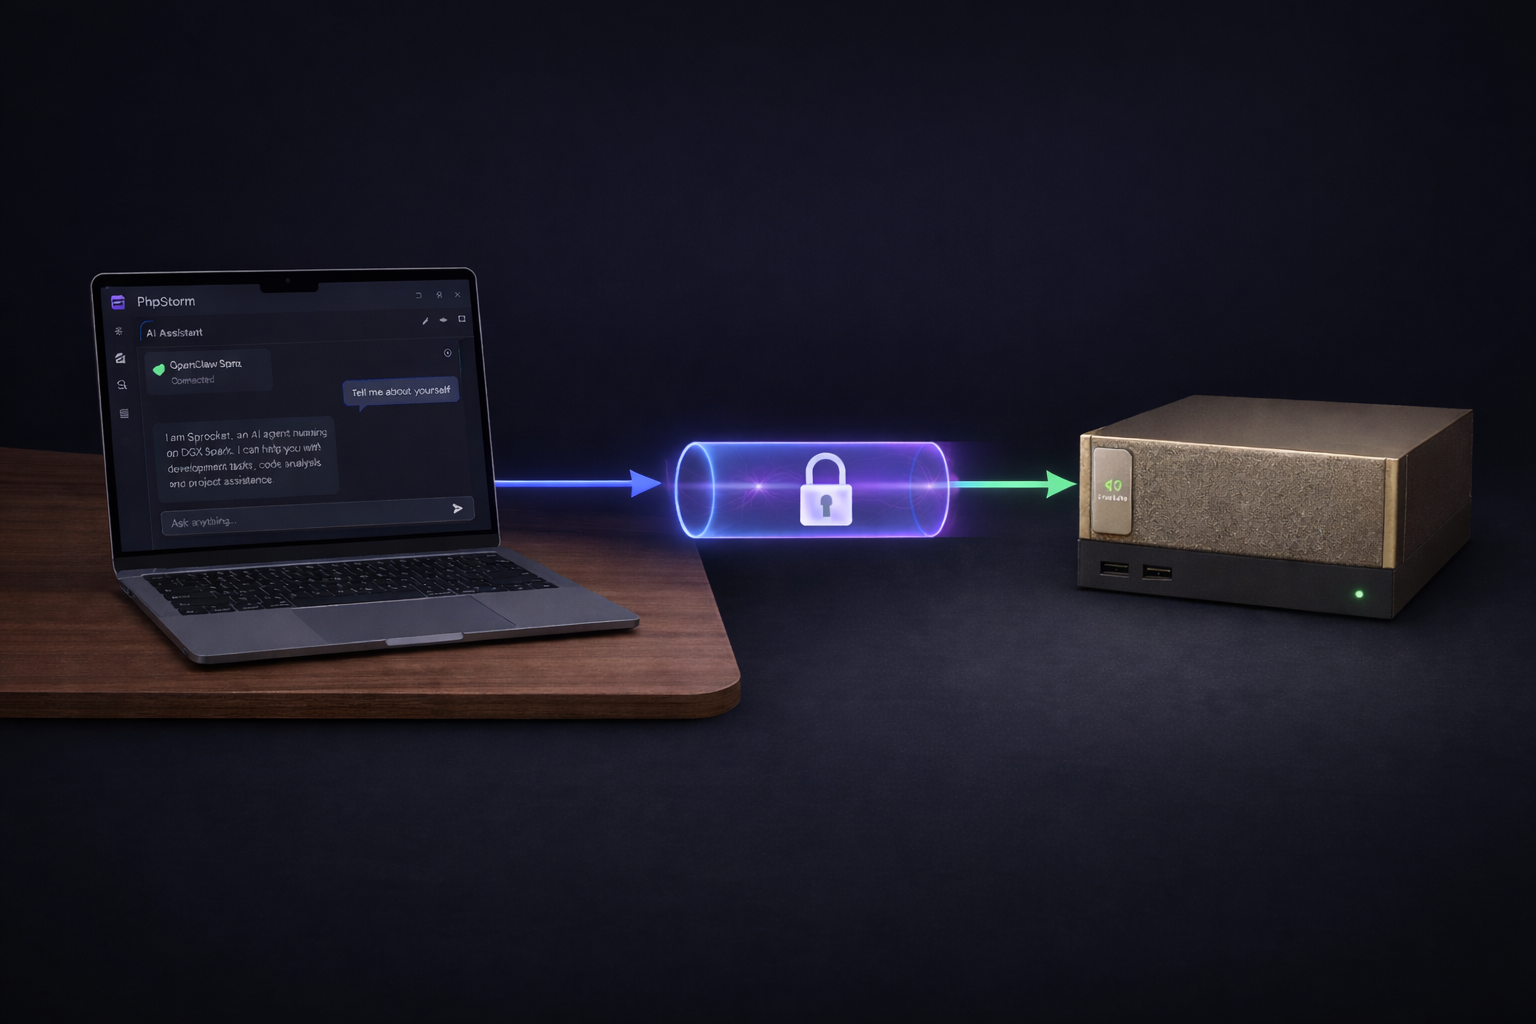
This article is going to show you how to connect OpenClaw to JetBrains.
JetBrains IDE To OpenClaw Outline
The basic outline for connecting JetBrains to OpenClaw assumes that you already have the Spark server set up and running OpenClaw Gateway with agents already active. The steps you need to connect a JetBrains IDE to the Spark agents include a few simple steps.
- Local OpenClaw Install
- Set Up the SSH Tunnel
- JetBrains IDE (PhpStorm in my case) Configuration
- Interact With the Spark Agent
Local OpenClaw Install
Yes, you’ll need to install OpenClaw on the MacBook Pro, but you’re not running the full service here. This is only used to serve as the ACP server that can take requests from PhpStorm and send them to the OpenClaw Gateway running on the Spark. This essentially serves as a communication assistant. You can find the commands for installing OpenClaw on the OpenClaw website.
I would not recommend opening up OpenClaw and using it fully on your daily-use laptop, as it can be a notable security risk.
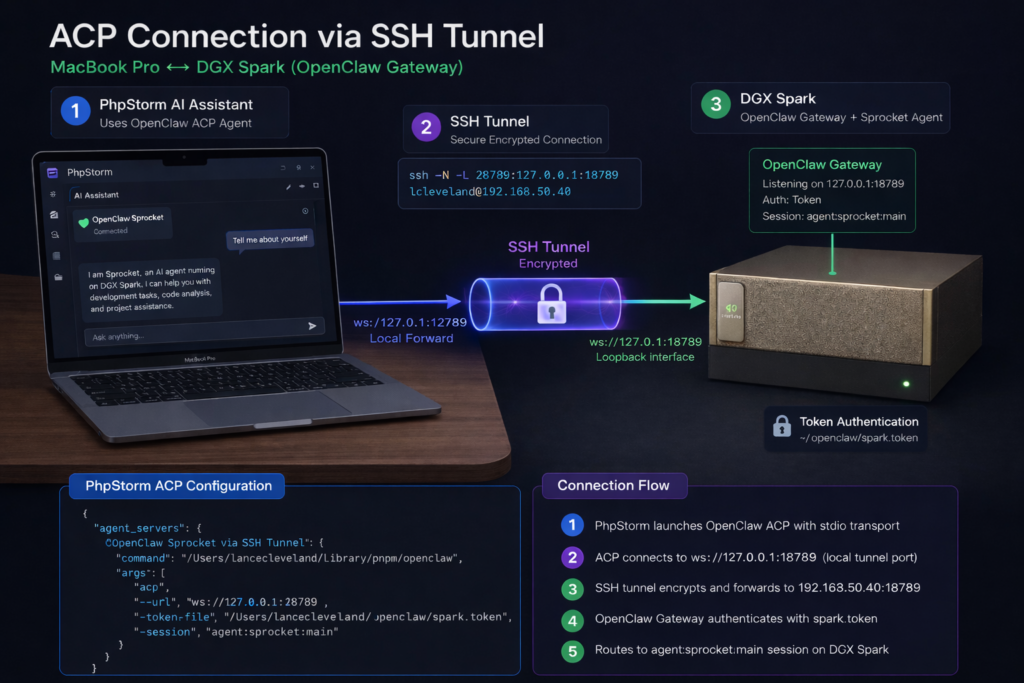
Setup The SSH Tunnel
This assumes you already have a server on your network, in my case DGX Mark, that is running the OpenClaw Gateway with agents configured. Here, my tunnel connects to the IP address of the Spark and is using local port 28789 on the laptop to talk to port 18789 on the Spark server.
ssh -N -L 28789:127.0.0.1:18789 lcleveland@192.168.50.40You’ll want to make sure you keep this terminal session and SSH tunnel open for the entire duration of your coding session from within the IDE if you plan on using your OpenClaw agent.
You can use a command like the following if you want to keep the tunnel open and running in the background without leaving a Terminal session open. I prefer not to do this, as I like to be able to check the Terminal window to see if the connection was closed for any reason.
ssh -f -N \
  -o ExitOnForwardFailure=yes \
  -o ServerAliveInterval=60 \
  -o ServerAliveCountMax=3 \
  -L 28789:127.0.0.1:18789 \
  lcleveland@192.168.50.40
JetBrains IDE Configuration
The basic outline here is to open your IDE and go to the AI Assistant, then add a new custom ACP agent. JetBrains should open the acp.json file for you automatically. This is where you will need to enter the information that runs the local OpenClaw ACP interface and tells it how to talk to the Spark. To do this, you will need a few key pieces of information, including:
• the full path to your local OpenClaw app
• the URL to your Spark server
• the Gateway token for OpenClaw on the Spark
• the ID of the agent you wish to communicate with
• and the SSH tunnel port that you are going to use
To get the path for your local OpenClaw app, open a Terminal session on the MacBook Pro and type which openclaw. Use the full path in the command line in your config JSON file.
For the token and an agent ID, you will want to open up a Terminal session on the Spark server and go to your OpenClaw install. You’ll want to look at the OpenClaw config file to get the token. If you search the file for the word token, you should see a long hex string as the token ID. You can also look in the agents list in the same file to get the agent ID, which is often a lowercase, no-spaces version of the agent name.
The last part you will need is the SSH tunnel address. That will depend on the SSH command you use on the MacBook to connect the MacBook to the Spark. The URL is usually your localhost, which would be 127.0.0.1: and then a port number. In my case, I like to leave the default OpenClaw port 18789 available to talk to the web UI. With that in mind, I opened my SSH tunnel so that my MacBook Pro uses port 28789 and maps to the Spark port 18789. The port on the Spark for the OpenClaw Gateway, 18789, can handle multiple requests and route them properly, so you can use the same port on the Spark for both the web UI and OpenClaw Gateway requests.
Here is an example from my acp.json config file:
{
    "default_mcp_settings": {
        "use_custom_mcp": true,
        "use_idea_mcp": false
    },
    "agent_servers": {
        "Sprocket on DGX Spark": {
            "command": "/Users/lancecleveland/Library/pnpm/openclaw",
            "args": [
                "acp",
                "--url",
                "ws://127.0.0.1:28789",
                "--token-file",
                "/Users/lancecleveland/.openclaw/spark.token",
                "--session",
                "agent:sprocket:main"
            ],
            "env": {}
        }
    }
}
You will want to make sure your default MCP settings portion of the file is in place. Otherwise, the ACP routing will try to use MCP services, which are not available through this method. Your command setting may be different than what you see here. This is for a typical install using the default curl command, not a Git repository or a direct app install like those available from EasyClaw.
You will also want to use the non-secure path to the SSH tunnel, which you see here as the ws: prefix on the URL parameter. You will also note that I use the localhost IP address and localhost port for the SSH tunnel instead of the Spark server IP address and listening port.
There is also an entry for the token file. You will want to store this in a secure location on your laptop. Create a file on your laptop and only paste in the token value you found in your OpenClaw configuration. You can see I put mine in the default OpenClaw install on the laptop and named it spark.token as the file name.

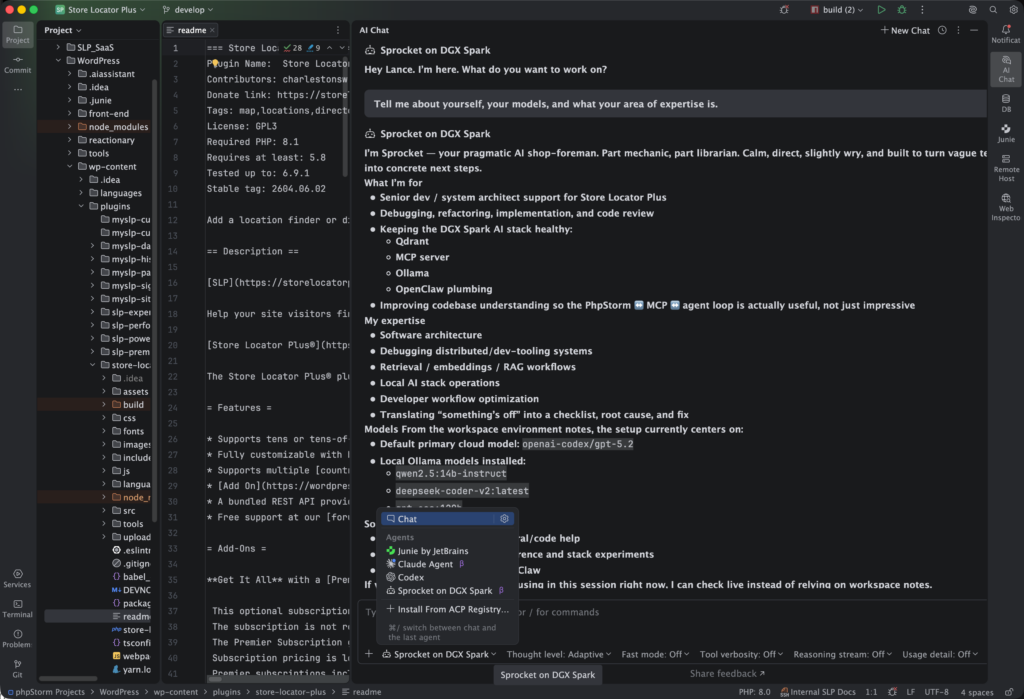
Talking To Your OpenClaw Agent Via JetBrains IDEs
With this configuration in place, you should now be able to connect to the custom ACP agent and have it execute your request on the Spark. In my setup, I have the Spark connected to a cloud-based GPT service for doing the heavy lifting of reasoning and processing my request. However, I do get the added benefit of the context of the request being formed by the specific knowledge I’ve instilled in the stack of permanent markdown files assigned to this agent.
One thing to be aware of when using this technique is that even a high-powered server like the DGX Spark will be notably slower than when you communicate directly from the IDE to a cloud-based agent such as OpenAI’s Codex or Claude Code. Thus, you’ll want to use one of the built-in agents such as Codex for processing interactive sessions. However, if you plan to do more generic work, where you give it a high-level task that can run for a longer period of time while you do other work, this methodology can significantly improve the quality of the work that agent performs. These agents on the Spark server have much deeper knowledge about your styles, standard operating procedures, code, validation, and architecture of the application. As such, they can often produce results faster, even though the request processing itself can take a little longer.
One thing to remember is that the agents bundled with your IDE are rather generic. They really don’t know anything about your project. Yes, you can train them by adding a lot of information into an AGENT.md file along with AI Assistant Rules. This is a good technique, but it does not have nearly the depth of knowledge about your project as what you can build and store on a Spark agent. And when you start using things like AI Assistant Rules, that creates vendor lock-in, as that is a JetBrains-specific implementation that mimics what the open source and non-proprietary OpenClaw solution provides.
Real World Comparison Of Agents
To give you an idea of how that works in the real world, I’ll provide a simple example. I asked the default code agent to find all deprecated calls to a React render function and replace them with a new createRoot version. The code agent spent a lot of time searching for files, talking to the cloud server, revising its plan of attack, and eventually coming up with a list of irrelevant legacy code to be edited. It never found the actual root cause of the deprecation warnings I was seeing, which lived in a React source directory. Instead, it found compiled build artifacts in legacy code that was stored for reference only.
When the same request was routed through Sprocket, the trained agent on the Spark, it had multiple instructional files that explained the difference between build output directories and source directories, as well as where the legacy code that could be ignored lived. Much of that was trained by previous interactions where it recorded prior attempts to resolve similar situations in memory files. That is one of the advantages of a service like OpenClaw with local agents. It can store long-term persistent memories about your tasks and then reference them again later when it needs help performing a new task. Thus, it was able to skip a dozen or so back-and-forth inquiries looking into files that didn’t matter.
[1:22 PM]
The end result was the default Codex agent working with the cloud-based ChatGPT 5.4 came back with a plan that was irrelevant. After all the work it performed, I had to enter a long prompt explaining all the things Sprocket on the Spark already knew. On the Spark, it got the request right the first time and immediately found the source files. The crazy part is that the cloud-based agent had access to the same source files, but never found them. I still don’t understand why it read so many files and did not think the proper source files were part of the problem.
Featured Image by GPT5.4