Cloning A VVV 2.6 Install
Decided to upgrade my long-term VVV setup that I use for daily client consulting work in preparation for a new gig as head of R&D and CTO for a super cool tech startup. As usual I should have left things alone as it was working fine; I only wanted to play with the newer VVV toys. You’d think I’d learn by now.
What I ended up doing was cloning a working baseline VVV install I had created a few weeks ago for the WordPress Plugin Development class I’ve been teaching at The Blockyard this year as part of the CodeBlock initiative.
Turns out this will be super useful for those nights when we have a dozen students all trying to initialize a new VVV install and we don’t have the bandwidth for 12 simultaneous 500MB box image downloads.
Here are the notes for a MacOS install. Windows will be slightly different but the same concepts apply.
Export The Existing VVV Box
I already had a fully functional VVV install with the matching virtual machine running at my ~/blockyard/VVV directory. First thing you’ll need to do it export the current machine image in a portable format.
The Vagrant package command will help. You’ll need to know your machine ID, usually the folder name where you run vagrant up plus a MD5 has of the full path name. Mine is VVV_056c649cef5. You can get this from the VirtualBox GUI if you are not sure.

Starting in the directory where the running install lives, first make sure your box is halted:
# vagrant halt
# vagrant package --base <id_of_running_box> --output ~/.vagrant.d/boxes/working_vvv.box
You now have a portable box file. This is much like the Ubuntu/Trusty64 image that gets downloaded from Hashicorp.
Add the box to Vagrant
Now you need to import that box into a Vagrant-ready format. Vagrant will do most of the work for you.
# vagrant box add ~/.vagrant.d/boxes/working_vvv.box --name "vvv/loaded-ubuntu-trusty64"Note that the path name where I exported the box is arbitrary. I liked to put it in the working directory for Vagrant so I can keep all my stuff in one place. That is not necessary. If you do that you risk naming your .box file the same as a Vagrant auto-created meta directory. Probably would have been better putting it someplace like ~/.vagrant.d/portable_boxes/working_vvv.box — but you get the idea.
Now your box is “known to Vagrant” and ready to use in a VVV backed environment.
Start a new VVV working folder
I found this works better from a CLEAN VVV install. A preexisting install will have a hidden .vagrant/machines folder that acts like a cache using JSON format meta data and is a lot harder to edit than the Vagrantfile we are about to hack. But first… start a fresh VVV directory.
# git clone -b master https://github.com/Varying-Vagrant-Vagrants/VVV.git ~/vagrant-local~/vagrant-local is the default baseline for the VVV docs so it may already exist. Rename accordingly.
Hack Vagrantfile
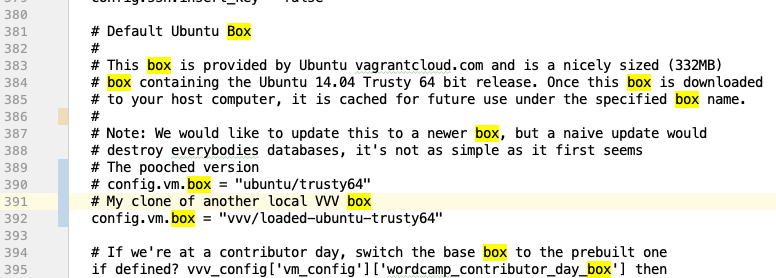
This is an important step. Especially when the default Ubuntu/Trusty64 package is pooched thanks to a down PHP repo for the apt-get commands that will run. The hack is easy, edit the Vagrantfile that was just cloned into the directory and change the config.vm.boxname

Since the box image is already available in the ~/.vagrant.d/boxes directory it will not have to download it from the Interwebs. That can be a life saver when loading up a dozen laptops at the same time.
