Selenium IDE Extensions Hacking
I use Selenium IDE as a tool for testing the Store Locator Plus WordPress plugin. It is a great tool for automating browser interactions and sussing out basic problems. With the launch of the My Store Locator Plus SaaS service we need to build more complex tests for multiple accounts and services. Thankfully Selenium IDE not only has a myriad of plugins but makes it easy to create your own.
While “officially sanctioned” Selenium Plugins are true Firefox browser plugins you can deploy your own commands written using the Selenium IDE objects and interfaces. These can be included by listing your local JavaScript file in the core extensions file list.
Now for the bad news. The documentation for building extensions is horrid, outdated, and typically non-existent. Which is where this article comes in. This is my personal notes on how to hackify your own Selenium IDE extensions.
You can create your Selenium Extension as any other JavaScript program. When you’ve created it you can add it via the Selenium Options menu drop down under core menu extensions.

Selenium.prototype.do<command>
This is the JavaScript command that you use to define a new Selenium IDE command. If needs to point to a function that is passed 2 parameters. The first parameter is what the user put in the target field. The second parameter is what the user put in the value field.
Selenium.prototype.doMyCommand = function( target, value )
{
    // Calculations and commands go here.
};
This would add a new command you invoke with MyCommand in Selenium IDE.
The command definition in the JavaScript prototype must start with an uppercase.
/**
 * IfTrue <condition>
 *
 * @param condition
 */
Selenium.prototype.doIfTrue = function( condition ) {
    this.doIf( condition , true );
};

/**
 * IfFalse <condition>
 *
 * @param condition
 */
Selenium.prototype.doIfFalse = function( condition ) {
    this.doIf( condition , false );
};

/**
 * EndIf
 */
Selenium.prototype.doEndIf = function(){};
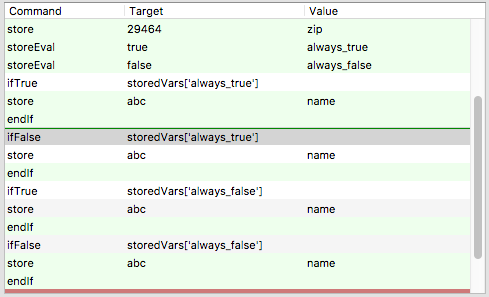
The command in the SCRIPT FILE will start with a lowercase.
<tr>
	<td>storeEval</td>
	<td>true</td>
	<td>always_true</td>
</tr>
<tr>
	<td>storeEval</td>
	<td>false</td>
	<td>always_false</td>
</tr>
<tr>
	<td>ifTrue</td>
	<td>storedVars['always_true']</td>
	<td></td>
</tr>
<tr>
	<td>store</td>
	<td>abc</td>
	<td>name</td>
</tr>
<tr>
	<td>endIf</td>
	<td></td>
	<td></td>
</tr>
<tr>
	<td>ifFalse</td>
	<td>storedVars['always_true']</td>
	<td></td>
</tr>
<tr>
	<td>store</td>
	<td>abc</td>
	<td>name</td>
</tr>
<tr>
	<td>endIf</td>
	<td></td>
	<td></td>
</tr>
<tr>
	<td>ifTrue</td>
	<td>storedVars['always_false']</td>
	<td></td>
</tr>
<tr>
	<td>store</td>
	<td>abc</td>
	<td>name</td>
</tr>
<tr>
	<td>endIf</td>
	<td></td>
	<td></td>
</tr>
<tr>
	<td>ifFalse</td>
	<td>storedVars['always_false']</td>
	<td></td>
</tr>
<tr>
	<td>store</td>
	<td>abc</td>
	<td>name</td>
</tr>
<tr>
	<td>endIf</td>
	<td></td>
	<td></td>
</tr>

this.continueFromRow( <int> )
Run the Selenium IDE command in the current test from the specified entry.
throw new Error( <string> )
Generate an error that will be logged by Selenium.
Selenium Variables – storedVars
Any store commands will place the variables in a named index in storedVars[<name>] where name is the value you assigned during the store.
testCase
The Selenium object that contains details about the current test being run.
testCase.debugContext.debugIndex
Get the current debug index. In theory the currently executing row.
testCase.commands
Contains the array of all the commands for the current test case.
testCase.commands[<int>].type
Type of command. At least one valid type is ‘command‘.
testCase.commands[<int>].command
The command the user entered, first entry in a Selenium row.
More Info
You can find some of my hacks based on the Sideflow Selenium plugin on Go With The Flow over at Bitbucket.